Service Guide
This section describes how to add or remove internal hardware
components.
The following sections describe how to remove the cover,
the door (for the Model 100), and the bezel.
Figure 16. Removing the cover of the Model 100
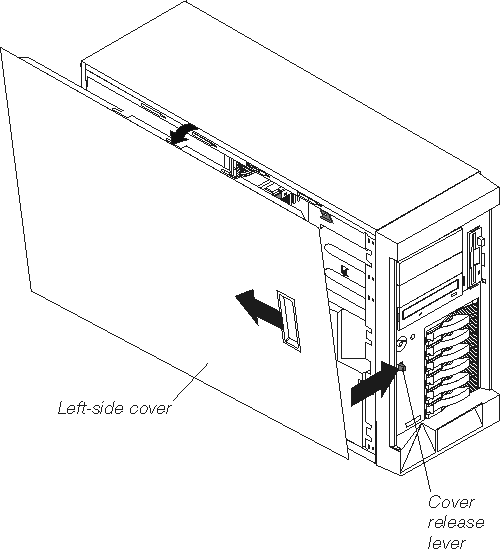
To remove the left-side cover of the Model 100:
- Review the information in Before you begin.
- If you are planning to install or remove any part other than a hot-swap
hard disk drive or hot-swap power supply, switch off the appliance and all
attached devices and disconnect all external cables and power cords.
- Slide the cover-release lever on the front of the appliance to release the
cover; then, slide the cover toward the rear of the appliance about 25 mm
(1 in.). Move the top edge of the cover out from the
appliance; then, lift the cover off the appliance. Set the cover
aside.
Attention: For proper cooling and airflow, replace the cover
before switching on the appliance. Operating the appliance for extended
periods of time (over 30 minutes) with the cover removed might damage
appliance components.
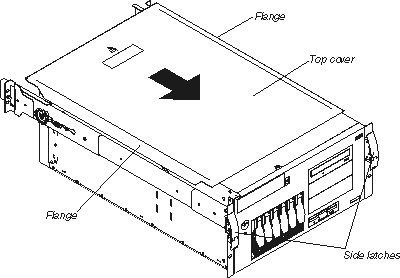
Figure 17. Removing the cover of the Model 200
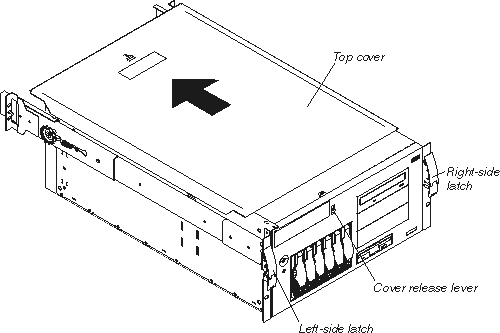
To remove the appliance top cover:
- Review the information in Before you begin.
- If you are planning to install or remove any part other than a hot-swap
hard disk drive or hot-swap power supply, switch OFF the appliance and all
attached devices and disconnect all external cables and power cords.
- Release the left and right side latches and pull the appliance out of the
rack enclosure until both slide rails lock.
| Note: | When the appliance is in the locked position, you can reach the cables on the
back of the appliance.
|
- Move the cover-release lever down while sliding the top cover toward the
rear of the appliance about 25 mm (1 in.). Lift the cover off
the appliance and set the cover aside.
Attention: For proper cooling and airflow, replace the cover
before switching on the appliance. Operating the appliance for extended
periods of time (over 30 minutes) with the cover removed might damage
appliance components.
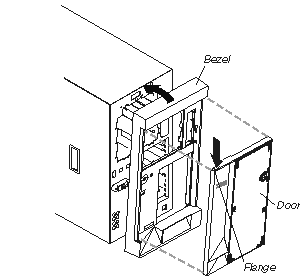
Figure 18. Removing the appliance door of the Model 100
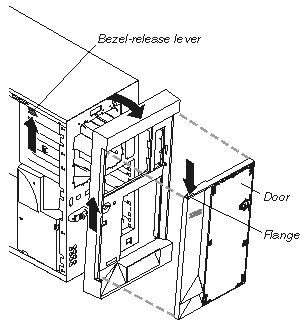
To remove the appliance door:
- Unlock and open the appliance door.
- Locate the flange on the top edge of the door.
- Press down on the flange while pressing out on the door; then, lift
the appliance door up and off the hinge. Set the door aside in a safe
place.
To remove the bezel:
- Move the blue bezel-release lever, following the curve of the lever
opening.
- Lift the bezel tabs out of the slots and pull the bezel away from the
appliance front. Store the bezel in a safe place.
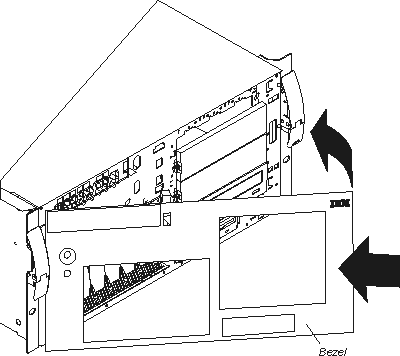
Figure 19. Removing the bezel of the Model 200
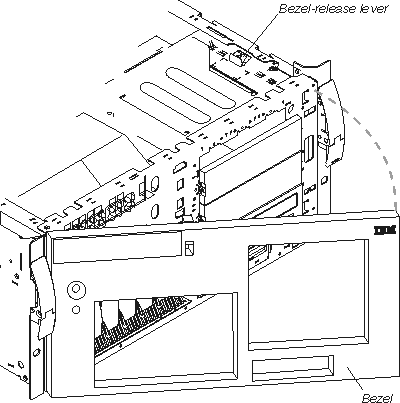
To remove the bezel:
- Move the blue bezel-release lever, following the curve of the lever
opening.
- Lift the bezel tabs out of the slots and pull the bezel away from the
appliance front. Store the bezel in a safe place.
Use the following instructions to install or replace a hot-swap hard
drive.
Figure 20. Installing a hot-swap drive
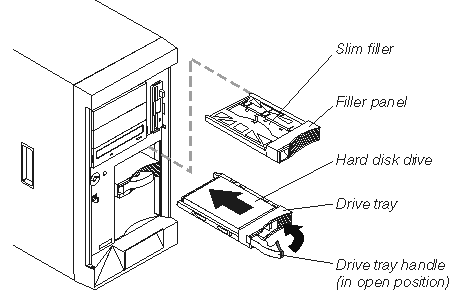
To install a drive in a hot-swap hard drive bay:
Attention:
- To maintain proper system cooling, do not operate the appliance for more
than two minutes without either a hard drive or a filler panel installed for
each bay. Therefore, if you are replacing a defective hot-swap drive,
either leave the defective drive in place or put in a filler panel until you
have a replacement drive.
- When you handle electrostatic discharge-sensitive devices (ESDs), take
precautions to avoid damage from static electricity. For details on
handling these devices, refer to Handling electrostatic discharge-sensitive devices.
- Remove the filler panel from one of the empty hot-swap drive bays by
inserting your finger into the depression at the left side of the filler panel
and pulling it away from the appliance.
| Note: | If you are installing a half-high hard drive, you will need to remove two
adjacent filler panels. The two filler panels should be from either the
top pair of drive bays, the middle pair of drive bays, or the bottom pair of
drive bays.
|
- Install the hard drive in the hot-swap drive bay:
- Ensure that the tray handle is open (that is, perpendicular to the hard
drive).
- Align the rails on the hard drive assembly with the guide rails in the
drive bay.
- Gently push the hard drive assembly into the drive bay until the hard
drive connects to the backplane.
- Push the tray handle toward the closed position until it locks the hard
drive in place.
- If you installed a half-high hard disk drive, install a slim filler in the
gap above the hard drive:
- Locate the slim filler that is designed for use with these half-high hard
drives. It is stored on the empty tray of the filler panel that you
removed earlier in this procedure.
- Pull the slim filler off the filler panel.
- Gently push the slim filler into place in the gap above the hard
drive.
- Check the hard drive status indicators to verify that the hard drives are
operating properly (the Hard Drive Status LED is immediately to the right of
the hard disk drive).
- When the amber LED is on continuously, the hard drive has failed.
- When the green LED flashes slowly (one flash per second), the hard drive
is being rebuilt.
- When the green LED flashes rapidly (three flashes per second), the
controller is identifying the hard drive.
| Note: | If your appliance has a RAID adapter installed, refer to the information
provided with the RAID adapter for information about adding a hard
drive.
|
You do not have to switch off the appliance to remove or install the
hot-swap hard drives.
Attention:
- Before you replace a hot-swap hard drive, check the Hard Drive Status LED
on the front of the drive to see if the drive is defective (if the drive is
defective, the LED will be amber). If you partially or completely
remove a good drive instead of a defective one, you might lose valuable
data.
This situation is especially relevant because your appliance has a RAID
adapter installed. The RAID adapter can rebuild the data that you need,
provided that certain conditions are met.
- Before you remove a hot-swap hard drive that is not defective, back up all
important data.
- To avoid damage to a hard drive, pull on the release lever to disengage
the hard drive connector from the backplane at the back of the drive bay, wait
approximately 30 seconds to allow the hard drive to spin down, and then
completely remove it from the bay.
Refer to Figure 21 while you perform the steps in this procedure.
Figure 21. Replacing a drive in a hot-swap drive bay in the Model 100
To replace a drive in a hot-swap drive bay:
- Before you begin, do the following:
- Read the documentation that comes with your hard drive.
- If your appliance has a RAID adapter installed, review the information
provided with the RAID adapter for information about replacing a hard
drive.
- If your appliance is a Model 100, unlock and open the appliance
door.
Attention: To maintain proper system cooling, do not operate
the appliance for more than two minutes without either a hard drive or a
filler panel installed for each drive bay.
- Locate the defective hard drive (look for an amber Hard Drive Status LED
on the front of the drive).
- Remove the defective hard drive: move the handle on the hard drive
to the open position (perpendicular to the hard drive) and pull the hot-swap
hard drive assembly from the drive bay.
- Install the replacement hard drive in the hot-swap drive bay:
- Ensure that the tray handle is open (that is, perpendicular to the hard
drive).
- Align the rails on the hard drive assembly with the guide rails in the
drive bay.
- Gently push the hard drive assembly into the drive bay until the hard
drive connects to the backplane.
- Push the tray handle toward the closed position until it locks the hard
drive in place.
- Check the hard drive status indicators to verify that the hard drive is
installed properly (the Hard Drive Status LED is located to the immediate
right of the hard disk drive).
- When the amber LED is on continuously, the hard drive has failed.
- If you have a RAID adapter installed:
- When the green LED flashes slowly (one flash per second), the hard drive
is being rebuilt.
- When the green LED flashes rapidly (three flashes per second), the
controller is identifying the hard drive.
- If your appliance is a Model 100, close and lock the appliance
door.
| Note: | The appliance's electromagnetic interference (EMI) integrity and cooling
are both protected by having the non-hot-swap drive bays covered or
occupied. When you install a hard disk drive, save the filler panel
from the bay in case you later remove the drive and do not replace it with
another.
|
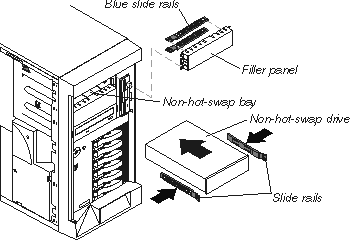
Figure 22. Installing a non-hot-swap hard drive
To install a non-hot-swap hard disk drive (5.25-inch, removable
media) in one of the non-hot-swap drive bays:
- Review the safety precautions in "Translated safety notices".
- Switch off the appliance and peripheral devices and then remove the cover
and the bezel (see "Removing the cover (Model 100)" for details).
- Remove the filler panel from the bay opening by pulling the filler panel
away from the appliance. You do not need the filler panel when you have
a hard drive installed in the drive bay.
- If the drive is a laser product, observe the following safety
precaution:
Caution:
When laser products (such as CD-ROMs, DVD-ROM drives, fiber optic devices, or
transmitters) are installed, note the following:
- Do not remove the covers. Removing the covers of the laser
product could result in exposure to hazardous laser radiation. There
are no serviceable parts inside the device.
- Use of controls or adjustments or performance of procedures other
than those specified herein might result in hazardous radiation
exposure.
DANGER!
Some laser products contain an embedded Class 3A or Class 3B laser
diode. Note the following.
Laser radiation when open. Do not stare into the beam, do not
view directly with optical instruments, and avoid direct exposure to the
beam.
Some laser products contain an embedded Class 3A or Class 3B laser
diode. Note the following:
Laser radiation when open. Do not stare into the beam, do not
view directly with optical instruments, and avoid direct exposure to the
beam.
| Note: | For translations of this safety notice, refer to Safety
Information.
|
- Touch the static-protective bag containing the drive to any unpainted
metal surface on the appliance; then, remove the drive from the bag and
place it on a static-protective surface.
- Set any jumpers or switches on the drive according to the documentation
that comes with the drive.
- Install rails on the drive. If you are installing a standard-size
drive:
- Pull the blue slide rails off the back of the filler panel.
- Clip the rails onto the sides of the drive.
- Align the rails on the drive with the guide rails in the drive bay.
- Push the drive into the bay until it clicks into place.
- Plug a connector on the IDE cable into the back of the drive.
- Ensure that the other end of the IDE cable is plugged into the IDE
connector on the system board.
- Connect a power cable to the back of the drive. Power
cables for non-hot-swap drives are in your appliance. The connectors
are keyed and can be inserted only one way.
- If you are installing another non-hot-swap drive, do so at this time;
otherwise, continue with the next step.
- If you have other options to install or remove, do so now; otherwise,
replace the cover (see "Replacing the cover" for details).
Your appliance comes with three hot-swap power supplies,
installed in bays 1, 2, and 3. The third power supply provides
additional redundancy. Each power supply has two status
indicators; see the following illustration for information about the
status indicators and power supply bay locations.
Figure 23. Replacing a hot-swap power supply
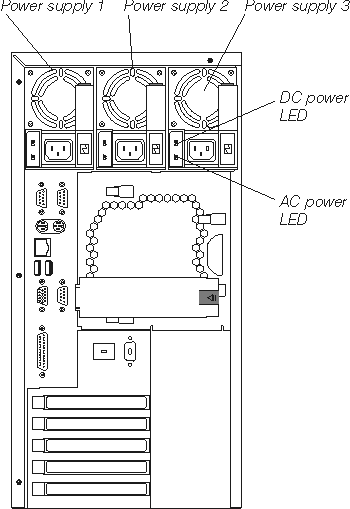
- Power Supply 1
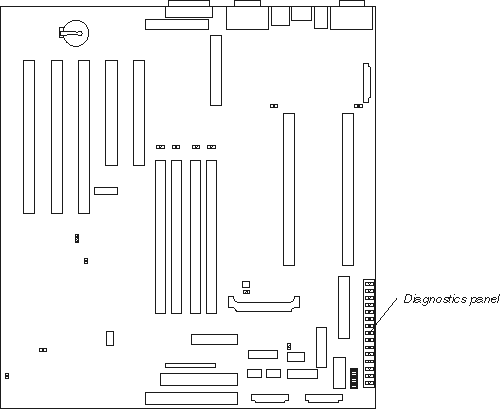
- LED PS1 on the system board diagnostics panel refers to this power
supply. See Figure 15 for more information about the diagnostics
panel.
- Power Supply 2
- LED PS2 on the system board diagnostics panel refers to this power
supply. See Figure 15 for more information about the diagnostics
panel.
- Power Supply 3
- LED PS3 on the system board diagnostics panel refers to this power
supply. See Figure 15 for more information about the diagnostics
panel.
- AC Power LED
- This LED provides status information about the power supply. During
normal operation, both the AC and DC Power LEDs are on. Refer to the
Power Supply LEDs section in the IBM TotalStorage IP Storage 200i
Administrator's Guide for more information.
- DC Power LED
- This LED provides status information about the power supply. During
normal operation, both the AC and DC Power LEDs are on. Refer to the
Power Supply LEDs section in the IBM TotalStorage IP Storage 200i
Administrator's Guide for more information.
|

|
|
|
|
|
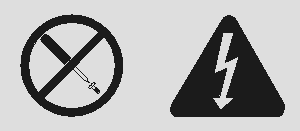
Caution:
Never remove the cover on a power supply or any part that has the following
label attached.
|
|
|
|
|
Hazardous voltage, current, and energy levels are present inside any
component that has this label attached. There are no serviceable parts
inside these components. If you suspect a problem with one of these
parts, contact a service technician.
|
| Note: | For translations of this safety notice, refer to Safety
Information.
|
You normally have power redundancy and hot-swappability. However, if
the load on your appliance requires the capacity of all installed power
supplies, you do not have redundancy or hot-swappability and must switch off
the appliance before removing any of your power supplies.
Attention: If you remove a power supply while the system is
running and when you do not have power redundancy, your system will abruptly
cease to function.
To remove a hot swap power supply
- Remove the engine covers.
- Check the LEDs on the diagnostics panel on the system
board.
- If the NON (non-redundant) LED is on, you do not have
redundancy: switch OFF the appliance and peripheral
devices; then, continue with step 3.
| Note: | The Information LED on the operator information panel on the front of the
appliance also will be on. See Appliance controls and indicators for the location and contents of the operator information
panel.
|
- If the NON LED is not lit, you have redundancy and do not need to switch
off the appliance. Continue with step 3.
Figure 24. Removing a hot-swap power supply
- Unplug the power cord from the power supply.
|
|
|
|
|
|
Caution:
The following label indicates a hot surface nearby.
|

|
|
| Note: | For translations of this safety notice, refer to Safety
Information.
|
- Remove the defective power supply.
- Install a replacement power supply (see Replacing a hot-swap power supply).
- Plug the power cord for the power supply into the power cord
connector.
- Verify that the AC Power LED and DC Power LED are on, indicating that the
power supply is operating correctly.
- If you switched the appliance off in step 2.2a, switch ON the appliance and peripheral
devices.
After you replace a power supply, verify that the power-supply status
indicators (AC Power LED and DC Power LED) are on, indicating that the power
supply is operating properly.
Notes:
- You do not need to switch off the power to the appliance to install
hot-swap power supplies.
- When replacing a power supply, do not remove the power supply until you
are ready to install its replacement.
Figure 25. Installing a hot-swap power supply
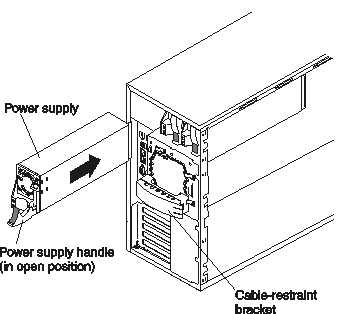
To replace a hot-swap power supply:
- Remove the power supply that you want to replace.
- Install the replacement power supply in the bay:
- Place the handle on the power supply in the open position (that is,
perpendicular to the power supply) and slide the power supply into the
chassis.
- Gently close the handle to seat the power supply in the bay.
- Plug the power cord for the power supply you just installed into the power
cord connector.
- Route the power cord through the cable-restraint bracket.
- Plug the power cord into a properly grounded electrical outlet.
- Verify that the DC Power LED and AC Power LED on the power supply are on,
indicating that the power supply is operating correctly.
- If you have other options to install or remove, do so now; otherwise,
go to Replacing the cover.
You can increase the amount of memory in your appliance by installing
memory-module kits. Each kit contains one industry-standard,
dual-inline memory module (DIMM). Your appliance uses a noninterleaved
memory configuration.
Your appliance comes with a dual-inline memory module (DIMM) installed on
the system board in connector J23.
| Note: | The Model 100 supports additional 256-MB, 512-MB, and 1-GB DIMMs. The
Model 200 supports additional 512-MB DIMMs. Both models support a
maximum of 2-GB of memory.
|
To install or replace a memory module (DIMM):
Attention: When you handle electrostatic discharge-sensitive
devices (ESDs), take precautions to avoid damage from static
electricity. For details on handling these devices, refer to Handling electrostatic discharge-sensitive devices.
- Review the safety precautions listed in Statement 1 and Statement 5 in Translated safety notices.
- Review the documentation that comes with your option.
- Switch off the appliance and peripheral devices and disconnect all
external cables and power cords.
- Remove the cover (see Removing the cover (Model 100) or Removing the cover (Model 200)).
- Touch the static-protective package containing the DIMM to any unpainted
metal surface on the appliance. Then, remove the DIMM from the
package.
| Note: | To avoid breaking the retaining clips or damaging the DIMM connectors, handle
the clips gently.
|
- Install or replace the DIMM:
| Note: | If you are replacing a DIMM, remove the old DIMM before performing the
following steps.
|
- Insert the DIMM into the connector by pressing on one edge of the DIMM and
then on the other edge of the DIMM. Be sure to press straight into the
connector. Be sure that the retaining clips snap into the closed
positions.
- Ensure that the retaining clips are in the closed position. If a
gap exists between the DIMM and the retaining clips, the DIMM has not been
properly installed. In this case, open the retaining clips and remove
the DIMM; then, reinsert the DIMM.
Figure 26. Installing a DIMM
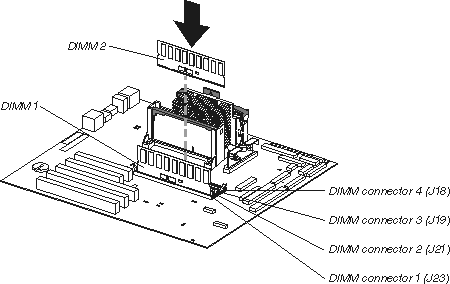
- Install additional DIMMs in the order specified in the documentation that
comes with your option. (See Figure 26 for memory connector locations.)
- Connect a keyboard and monitor to the appliance.
- Restart the appliance.
- The system displays a message indicating that a configuration error
occurred. Follow the onscreen prompts to review and save the new memory
configuration. After you save changes and exit the
Configuration/Setup Utility program, the appliance will
restart.
- If you have other options to install or remove, do so now; otherwise,
replace the cover (seeReplacing the cover) and then return to these procedures.
- Disconnect the keyboard and monitor.
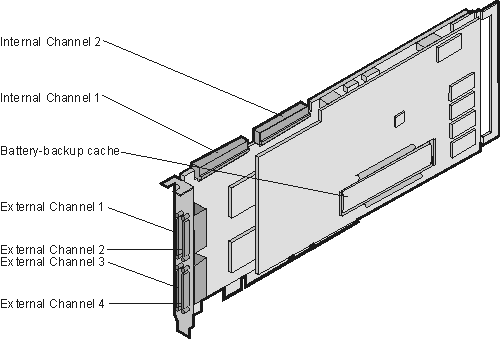
This section provides illustrations of the SCSI channel connectors and
cable connectors for the ServeRAID-4H and ServeRAID-4L controllers.
The ServeRAID-4H controller has four independent SCSI
channel connectors: Channel 1, Channel 2, Channel 3, and Channel
4. Each of these SCSI channels supports up to 15 physical
devices.
| Note: | The battery-backup cache protects the data being stored in the ServeRAID
cache memory during a power outage or failure when using the write-back
mode.
|
Figure 27. ServeRAID-4H controller
In the ServeRAID-4H controller, an internal SCSI device is attached to
channel 1. This means you cannot attach an external SCSI device to
channel 1.
| Note: | The ServeRAID-4H controller uses the module (P/N 38L3386) containing a
lithium battery.
|
Statement 2
Caution:
When replacing the lithium battery, use only IBM Part Number 33F8354 or an
equivalent type battery recommended by the manufacturer. If your system
has a module containing a lithium battery, replace it only with the same
module type made by the same manufacturer. The battery contains lithium
and can explode if not properly used, handled, or disposed of.
Do not:
- Throw or immerse into water
- Heat to more than 100°C (212°F)
- Repair or disassemble
Dispose of the battery as required by local ordinances or
regulations.
| Note: | For translations of this safety notice, refer to Safety
Information.
|
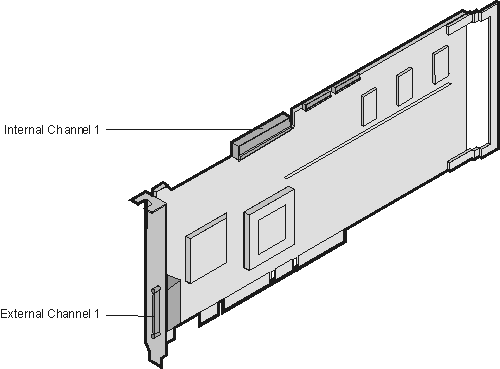
The ServeRAID-4L controller has one independent
SCSI channel connector: Channel 1. This SCSI channels supports up
to 15 physical devices.
Figure 28. ServeRAID-4L controller
You cannot attach any external devices to the ServeRAID-4L
controller.
| Note: | The ServeRAID-4L controller uses the module (P/N 38L3386) containing a
lithium battery.
|
Statement 2
Caution:
When replacing the lithium battery, use only IBM Part Number 33F8354 or an
equivalent type battery recommended by the manufacturer. If your system
has a module containing a lithium battery, replace it only with the same
module type made by the same manufacturer. The battery contains lithium
and can explode if not properly used, handled, or disposed of.
Do not:
- Throw or immerse into water
- Heat to more than 100°C (212°F)
- Repair or disassemble
Dispose of the battery as required by local ordinances or
regulations.
| Note: | For translations of this safety notice, refer to Safety
Information.
|
During the installation, you might need a small, flat-blade
screwdriver.
To install the ServeRAID-4H or ServeRAID-4L controller:
- Review the Safety Information book provided with your
appliance.
- Switch off the appliance and disconnect all power cords and
cables from the appliance.
- Remove the appliance cover.
- Remove the expansion-slot cover.
- Touch the static-protective package containing the controller to an
unpainted metal expansion-slot cover on the appliance. This discharges
any static electricity from the package and from your body.
- Remove the controller from the static-protective package holding the
controller by the edges. Do not touch any exposed components on the
controller.
- Insert the controller in the PCI expansion slot. Press the
controller firmly into the slot so that it is fully seated.
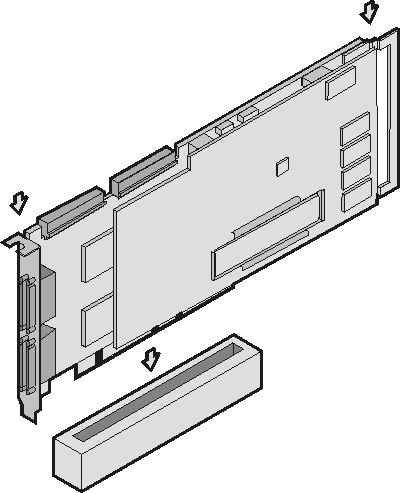
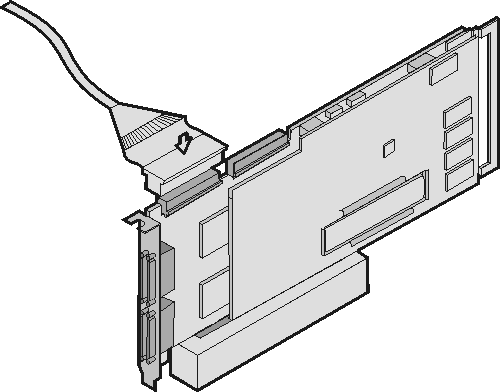
Figure 29. Inserting a ServeRAID-4H controller into the PCI expansion slot
- Secure the controller by either tightening the expansion-slot screw on the
top of the controller or closing the latch, depending on your
appliance.
- Connect the internal SCSI cable to the controller. If you intend to
attach external devices only, go to step 13. Otherwise, continue with step 10.
- Connect one end of a 68-pin ANSI standard cable to the
internal channel connector on the ServeRAID controller.
Figure 30. Connecting a ServeRAID-4H controller internal channel connector
- Ensure that the other end of the SCSI cable is attached to the SCSI
backplane.
- If you have physical drives to install, install them now. See your
appliance documentation for drive installation instructions.
| Note: | The ServeRAID controllers use SCSI ID 7.
|
- Install the appliance cover.
- If you disconnected the cables and power cords in step 2, reconnect the cables and cords. See your appliance
documentation if you need detailed instructions.
- If you want to attach an external SCSI device to the ServeRAID controller,
continue with Connecting external devices. Otherwise, go to Updating BIOS and firmware code.
| Note: | The ServeRAID-4L does not support external
connection. The ServeRAID-4H supports external connection on Channels
2, 3, and 4.
|
To attach SCSI devices to an external channel connector on the ServeRAID-4H
controller:
- Connect one end of a 68-pin very high density connector interface (VHDCI)
SCSI cable to an external channel connector on the ServeRAID
controller.
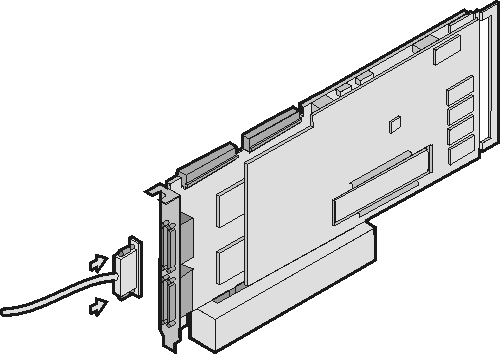
Figure 31. Connecting a ServeRAID-4H controller external channel connector
- Connect the other end of the SCSI cable to the external SCSI
device.
- Continue with "Updating BIOS and firmware code."
Before configuring the ServeRAID controller, you must have the latest BIOS
and firmware code installed on your appliance.
- Attach a keyboard and monitor to the appliance.
- Start a browser.
- Go to www.ibm.com/storage/support/nas.
- Select BIOS and firmware code for the ServeRAID
controller.
- Boot the diskettes as directed and follow the onscreen
instructions.
- Remove the diskette and reboot the appliance.
Follow these instructions to configure a ServeRAID Controller:
- Connect a keyboard and monitor to the appliance; then, switch on the
appliance.
| Note: | A ServeRAID BIOS message appears. If the BIOS detects a mismatch in
the configuration, it shows a status of Fail and prompts you to press a
function key to continue. Press F10 to continue without
changing the configuration.
|
- When prompted to start the Mini-Configuration Program, press
Ctrl+I.
- Select Advanced functions.
- Select Copy the configuration from drives to the
controller.
- Confirm the action by typing y. Wait until prompted to
Press any key to continue.
- From the Advanced functions menu, select Configure BIOS
settings.
- Select Bypass read/verify operations and ensure that it says
Yes. If it says No, then press Enter to change the option to
Yes.
- Select Save configuration to the ServeRAID controller.
- Select Exit; then, select Exit again.
This will terminate the Mini-Configuration program.
- Press Ctrl+Alt+Del to reboot the appliance.
Your appliance comes with three PCI slots. One slot contains the
Gigabit Ethernet Adapter, one slot contains the ServeRAID, and the third slot
always remains vacant.
The Gigabit Ethernet Adapter can be either a Gigabit Ethernet Copper
Adapter or a Gigabit Ethernet SX Adapter, depending on your needs. Use
these instructions to replace a bad Gigabit Ethernet Adapter or to change your
adapter type (for example, changing from a Gigabit Ethernet Copper Adapter to
a Gigabit Ethernet SX Adapter).
- Switch OFF and unplug your system. Then remove its cover.
- Remove the cover bracket from the PCI busmaster slot. Ensure that
the exposed end does not contact any conducting part of the
motherboard.
- Push the adapter into the slot until the adapter is firmly seated.
Then secure the adapter brackets with a screw.
- Replace the computer cover and plug in the power cord.
- Switch the power on. The computer's PCI BIOS automatically
assigns resources to the adapter or adapters.
This section describes how to attach the network cable to a Gigabit
Ethernet Copper Adapter or Gigabit Ethernet SX Adapter.
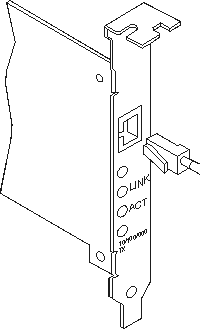
Insert the Category 5 twisted-pair RJ-45 network cable into the
adapter's connector.
Figure 32. Attaching a Gigabit Ethernet Copper Adapter
For 1000BASE-T or 100BASE-TX, your network cable must be Category 5,
twisted-pair wiring. If you plan to run the adapter at 1000 Mbps, it
must be connected to a compatible 1000 Mbps switch.
| Note: | Most compatible switches do not support all three speeds on a single
port. Check your switch documentation for details.
|
For 10BASE-T, use Category 3, 4, or 5 twisted-pair wiring. If you
want to use this adapter in a residential environment, you must use a Category
5 cable.
| Note: | The Gigabit Ethernet SX Adapter is a fiber adapter.
|
Remove and save the fiber optic connection cover. Insert a
1000BASE-SX duplex type SC fiber optic connector into the ports on the
PRO/1000 Gigabit adapter bracket, as shown in the following
illustration. The connector and ports are keyed for proper
orientation.
The PRO/1000 fiber-based adapter must be connected to an IEEE
802.3z-compliant gigabit switch, such as the Intel(R) 470 Gigabit
Switch.
Figure 33. Attaching a Gigabit Ethernet SX Adapter
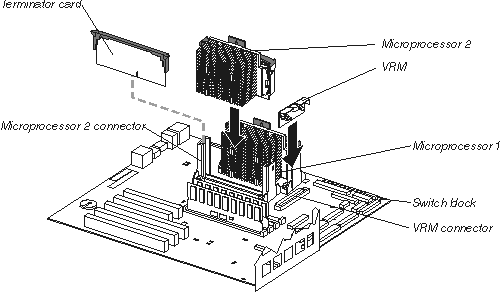
The Model 100 includes one microprocessor installed on the system
board.
Notes:
- Before you replace a microprocessor, review the documentation that comes
with the microprocessor, so that you can determine whether you need to update
the appliance basic input/output system (BIOS). The latest level of
BIOS for your appliance is available at:
www.ibm.com/storage/support/nas
- Your appliance comes with one microprocessor installed in the
microprocessor connector (U3) that is closest to the power supply. This
is the startup (boot) microprocessor. A microprocessor installed in
connector U17 is microprocessor 2. If more than one microprocessor is
installed, the microprocessor installed in microprocessor connector U17 is the
startup processor and the microprocessor installed in U3 is the application
processor.
Attention: To avoid damage and ensure proper appliance
operation when you replace a microprocessor, use microprocessors that have the
same cache size and type, and the same clock speed. Microprocessor
internal clock frequencies and external clock frequencies must be
identical.
Figure 34. Replacing a microprocessor
To replace a microprocessor:
Attention: When you handle electrostatic discharge-sensitive
devices (ESDs), take precautions to avoid damage from static
electricity. For details on handling these devices, refer to Handling electrostatic discharge-sensitive devices.
- Review the safety precautions listed in Statement 1 and Statement 5 in Translated safety notices.
- Switch off the appliance and peripheral devices and disconnect all
external cables and power cords; then remove the cover (see Removing the cover (Model 100) for details).
- Remove the terminator card from the microprocessor connector. Store
the terminator card in a safe place in the static-protective package that your
new microprocessor is shipped in; you will need to install it again if
you ever remove the microprocessor and do not replace the
microprocessor.
- Replace the microprocessor:
- Touch the static-protective package containing the new microprocessor to
any unpainted metal surface on the appliance; then remove the
microprocessor from the package.
- Center the microprocessor over the microprocessor connector and carefully
press the microprocessor into the connector.
| Note: | To remove a microprocessor, pull upward on the microprocessor handle
tab.
|
- Install the voltage regulator module (VRM) included in the microprocessor
kit.
Attention: Use of other VRMs might cause your appliance to
overheat.
- Center the VRM over the VRM connector. Ensure that the VRM is
oriented and aligned correctly.
- Press the VRM into the connector.
| Note: | If you remove the microprocessor later, remember to install the terminator
card in the appropriate microprocessor connector and to remove the VRM.
|
- If you have other options to install or remove, do so now; otherwise,
go to Replacing the cover.
Your appliance comes with two fan assemblies.
Attention: Replace a fan that has failed within 48 hours to
help ensure proper cooling.
Figure 35 shows the replacement of a fan assembly.
Figure 35. Replacing the fan assembly
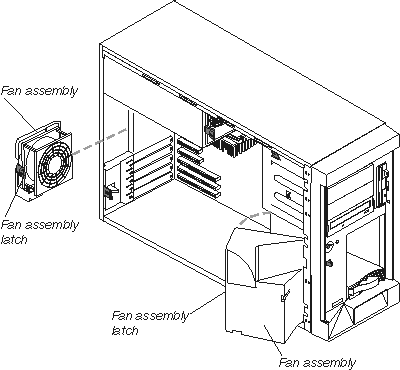
To replace the fan assembly:
- Review the safety precautions listed in Statement 1 and Statement 5 in Translated safety notices.
- Switch off the appliance and peripherals.
- Remove the cover. See Removing the cover (Model 100) for details.
- Determine which fan assembly to replace by checking the LED on each
fan; an LED that is on indicates the fan you need to replace.
- Remove the fan assembly from the appliance:
- Disconnect the fan cable from the system board.
- Press the blue release latch for the fan and pull the fan away from the
appliance.
- Slide the replacement fan assembly into the appliance until it clicks into
place.
- Connect the fan cable to the system board.
- Verify that the FAN LED on the diagnostic panel is not on. If the
FAN LED is on, reseat the fan.
- If you have other options to install or remove, do so now; otherwise,
go to "Replacing the cover".
Figure 36. Replace the Model 100 cover
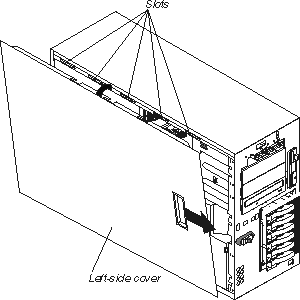
To replace the appliance left-side cover:
- Align the cover with the left side of the appliance, about 25 mm
(1 in.) from the front of the appliance; place the
bottom of the cover on the bottom rail of the chassis.
- Insert the tabs at the top of the cover into the slots at the top of the
appliance.
- Hold the cover against the appliance and slide the cover toward the front
of the appliance until the cover clicks into place.
Figure 37. Replacing the Model 200 cover
To replace the appliance top cover:
- Align the top cover with the top of the appliance, about 25 mm
(1 in.) from the front of the appliance; the flanges on
the left and right sides of the cover should be on the outside of the
appliance chassis.
- Hold the cover against the appliance and slide the cover toward the front
of the appliance until the cover clicks into place.
Figure 38. Replacing the Model 100 bezel
To replace the bezel:
- Place the tabs at the bottom edge of the bezel in the slots at the bottom
front of the appliance.
- Press the top of the bezel toward the appliance until it clicks into
place.
To install the appliance door:
- Set the door on the bottom hinge.
- Press the flange downward while pressing the top of the door toward the
appliance, until the flange connects with the top hinge. Then, release
the flange.
- Close and lock the appliance door.
Attention: Be sure to maintain a clearance of at least
127 mm (5 in.) on the front and rear of the
appliance to allow for air circulation.
Figure 39. Replacing the Model 200 bezel
To replace the bezel:
- Place the tabs on the left side of the bezel in the slots at the left
front of the appliance.
- Press the right end of the bezel toward the appliance until the bezel
clicks into place.
[ Top of Page | Previous Page | Next Page | Table of Contents | Index ]