
The development cycle presented so far is a fairly simple one in which everyone in an organization contributes to the same development project. But a software development cycle often involves several concurrent development projects. For example:
This chapter describes the functions that Rational ClearCase provides to support parallel development. Parallel development is a style of working in which teams use the same set of source files for different, concurrent development projects:
(You do not need to read the section about sharing control of a branch with developers at other sites unless your project manager or MultiSite administrator directs you.)
Each time you revise and check in an element, ClearCase creates a new version of the element in the VOB. This linear progression is illustrated by Figure 39.

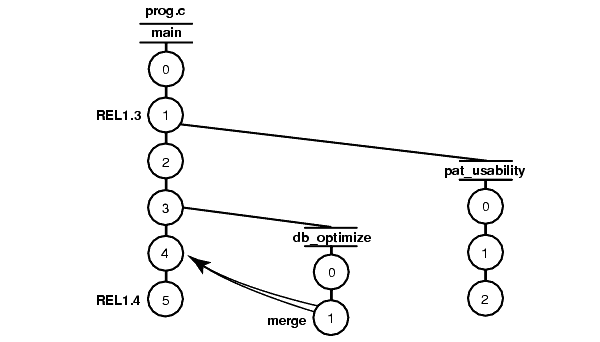
ClearCase can organize the different versions of an element in a VOB into a version tree. Like any tree, a version tree has branches. Each branch represents an independent line of development. Changes on one branch do not affect other branches unless you merge. In Figure 40, main, pat_usability, and db_optimize are branches being used to develop different releases of the file element prog.c concurrently.
When you create a subbranch for an element, which is any branch below the main branch, the initial version contains the same data as the version from which you start the branch (Figure 41). (The initial version on the main branch contains no data. For more information, see Excluding Elements from Loading.)

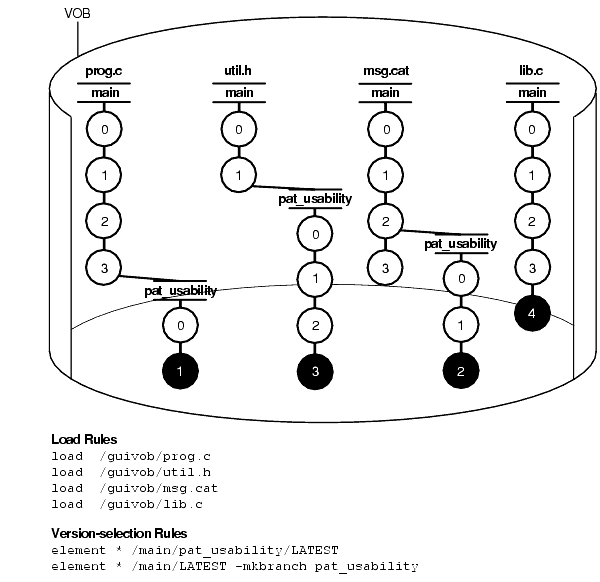
The policies of your organization may dictate that each development project use its own branch to isolate its changes from other development projects. To adhere to this policy, each member of a project team uses a view whose config spec specifies the following information:
For example, each member of the project team that is optimizing the database schema uses a view that selects versions on the db_optimize branch and creates new versions on that branch.
For more information about branches, see Managing Software Projects and the mkbranch reference page in the Command Reference.
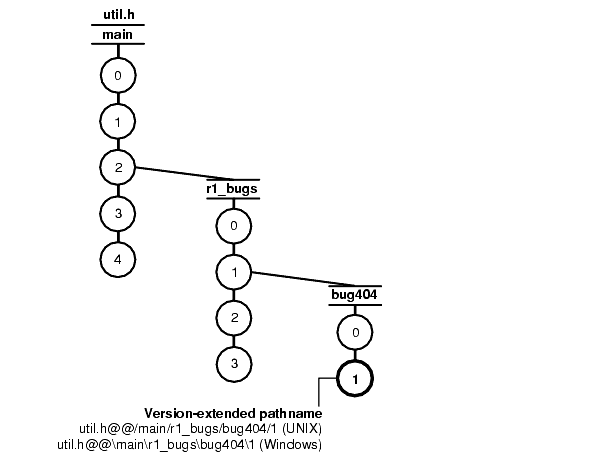
ClearCase commands and documentation use a notation to specify a version of an element on a branch. For example, util.h@@/main/2 specifies version 2 of util.h on the main branch; util.h@@/main/r1_bugs/bug404/1 specifies version 1 of util.h on the bug404 subbranch below the r1_bugs subbranch, which is below the main branch (Figure 43).
From a command-line interface, you can use version-extended paths to access versions other than the ones currently selected by your view. To view the contents of a version that is not currently in a snapshot view, you must use the cleartool get command in addition to version-extended paths.
For information about the syntax for version-extended paths, see the pathnames_ccase reference page in the Command Reference.
In a parallel development environment, the opposite of branching is merging. In the simplest scenario, merging incorporates changes on a subbranch into the main branch. However, you can merge work from any branch to any other branch. ClearCase includes automated merge facilities for handling almost any scenario.
One of the most powerful of ClearCase features is source control of directories. Each version of a directory element catalogs a set of file elements, directory elements, and VOB symbolic links. In a parallel development environment, directory-level changes may occur as frequently as file-level changes. All the merge scenarios discussed in this chapter apply to both directory and file elements.
This section describes the following merge scenarios:
ClearCase also supports merging work from many branches to a single branch; this is typically a project manager’s or integrator’s task (see Managing Software Projects).
A merge combines the contents of two or more files or directories into a new file or directory. The merge algorithm uses the following files during a merge (Figure 44):

To merge files and directories, ClearCase takes the following steps:

A merge is a straightforward extension of a file comparison. Instead of displaying the differences, Diff Merge analyzes them (sometimes with your help) and copies sections of text to the output file:
(You can turn off automatic acceptance of this kind of change.)
Be sure to verify that the changes you accept produce consistent merged output. For example, after performing a merge involving file util.h, you can compare files util.h.contrib (which contains its previous contents) and the new util.h (which contains the merge output).
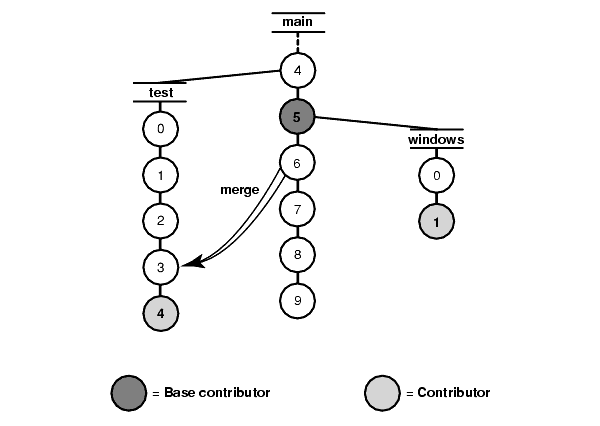
If all the contributors are versions of the same element, Diff Merge determines the base contributor automatically. It examines the version tree of the element, which includes all the merge arrows created by previous merge operations. This examination reveals the relationships among versions from the standpoint of their contents (which versions contributed their data to this version?), rather than their creation order (which versions were created before this version?). Diff Merge selects as the base contributor the closest common ancestor in this enhanced version tree.
Figure 46 illustrates a common case of merging. If no merges have been performed in the element, the actual common ancestor (5) of the contributors (test/4 and windows/1) in the version tree is selected to be the base contributor.
If the contributors are not all versions of the same element, there is no common ancestor (or other base contributor). In this case, ClearCase turns off automated merging, and you must resolve all discrepancies among the contributors.
Under the following conditions, the merge is recorded by creating one or more merge arrows (hyperlinks of type Merge):
Diff Merge draws an arrow from each contributor version (except the base contributor) to the target version. You can see merge arrows with the Version Tree Browser.
The find and lsvtree –merge commands can locate versions with Merge hyperlinks. The describe command lists all of the hyperlinks of a version, including merge arrows:
cleartool describe util.h@@/main/3
version "util.h@@/main/3"
.
.
.
 Hyperlinks:
 Merge@278@/vob_3 /vob_3/src/util.h@@/main/rel2_bugfix/1
 -> /vob_3/src/util.h@@/main/3
Each version of a ClearCase directory element contains the names of certain file elements, directory elements, and VOB symbolic links. Diff Merge can process two or more versions of the same directory element, producing a directory version that reflects the contents of all contributors. The algorithm is similar to that for a file merge. Diff Merge prompts for user interaction only when two or more of the contributors are in conflict.
One of the directory versions—the merge target—must be checked out. (Typically, it is the version in your view.) Diff Merge updates the checked-out directory by adding, removing, and changing names of elements and links.
Note: A directory merge does not leave behind a .contrib file, with the pre-merge contents of the target version.
We recommend that you use this procedure when merging directories:
If you follow this procedure, it easier to determine exactly what the merge accomplished. Enter a diff –predecessor command on the checked-out version, which has just been updated by merge.
ClearCase uses VOB hard links to implement directory merges. You can use the ln and rmname commands to perform full or partial merges manually. See the ln and rmname reference pages in the Command Reference.
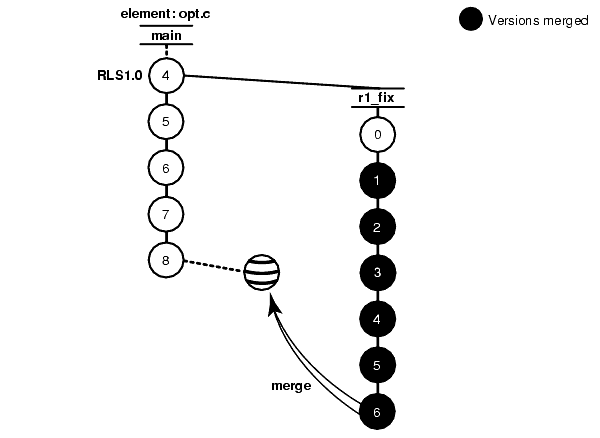
Merging all changes made on a subbranch is the simplest and most common scenario (Figure 47).
Bug fixes for an element named opt.c are being made on branch r1_fix, which was created at the baseline version RLS1.0 (/main/4). Now, all the changes made on the subbranch are to be incorporated into main, where a few new versions have been created in the meantime.
Merging the changes from the r1_fix branch involves the following tasks:
The view must select the target version, which, in Figure 47, is opt.c@@/main/8.
clearmrgman
In your project, several elements might have versions on the r1_fix branch. With the Merge Manager, you can choose for which elements you merge changes from one branch to another.
For detailed information about completing this task, see the findmerge reference page in the Command Reference or ClearCase Help. For information about starting Help, see To Access Online Information.
In the selective merge scenario, the project manager wants to incorporate into new development several lines of code that were added in version /main/r1_fix/4 (Figure 48).
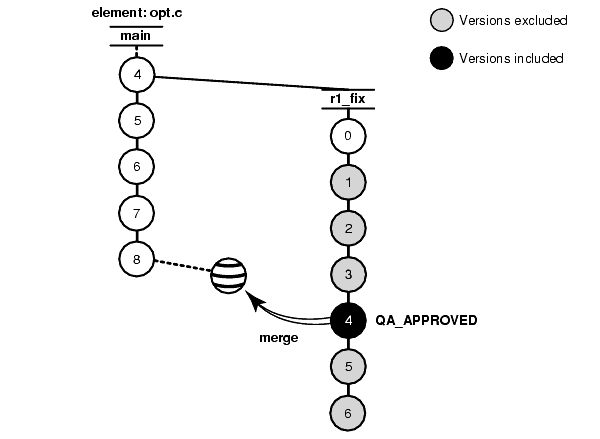
It is critical that you merge only the lines of code as written in this version: it was used and verified to fix a specific bug that prevents further development on the new project.
Selective merges can be tricky: versions you exclude as contributors to the merge may contain needed revisions. For example, if the function you added in /main/r1_fix/4 relies on a variable definition that was added in /main/r1_fix/2, you must include version 2 in the merge.
You can also specify a single range of consecutive versions to contribute to the merge. For example, if you need the variable definitions added in /main/r1_fix/2 as well as the code added in /main/r1_fix/4, you can include versions 2 through 4 in the merge.
Merging selective versions from the r1_fix branch involves the following tasks:
The view must select the target version, which in Figure 48 is opt.c@@/main/8.
For example, the following commands merge only the changes in version 4 on the r1_fix branch:
cleartool checkout opt.c
cleartool merge –graphical –to opt.c –insert –version /main/r1_fix/4
These commands merge only the changes in versions 2 through 4 on the r1_fix branch:
cleartool checkout opt.c
cleartool merge –graphical –to opt.c –insert –version /main/r1_fix/2 /main/r1_fix/4
Note: In a selective merge, ClearCase does not create a merge arrow. A merge arrow indicates that all the data of a version has been merged, not parts of it.
For detailed information about completing this task, see the merge and version_selector reference pages in the Command Reference or see Help. For information about starting Help, see To Access Online Information.
The project manager has decided that a new feature, implemented in versions 14 through 16 on the main branch, will not be included in the product. You must perform a subtractive merge to remove the changes made in those versions (Figure 49).

A subtractive merge is the opposite of a selective merge: it removes from the checked-out version the changes made in one or more of its predecessors. Performing a subtractive merge involves the following tasks:
The view must select the branch from which you want to remove revisions.
For example, the following commands remove revisions to versions 14 through 16 on the main branch:
cleartool checkout opt.c
cleartool merge –graphical –to opt.c –delete –version /main/14 /main/16
Note: In a subtractive merge, ClearCase does not create a merge arrow. A merge arrow indicates that data has been merged, not removed.
For detailed information about completing this task, see the merge and version_selector reference pages in the Command Reference or see Help. For information about starting Help, see To Access Online Information.
You can merge versions of an element manually or with any available analysis and editing tools. To update the version tree of an element with a merge that occurs outside ClearCase, do the following:
After you draw the merge arrow, your merge is indistinguishable from one performed with ClearCase tools.
For example, use the following commands to merge a version of nextwhat.c on the enhance branch to the branch currently selected by your view:
cleartool checkout nextwhat.c
Checkout comments for "nextwhat.c":
merge enhance branch
.
Checked out "nextwhat.c" from version "/main/1".

<use your own tools to merge data into checked-out version>

cleartool merge –to nextwhat.c –ndata –version .../enhance/LATEST
Recorded merge of "nextwhat.c".
The –ndata option suppresses the merge but creates merge arrows as if ClearCase had merged the versions.
For detailed information about completing this task, see the merge and version_selector reference pages in the Command Reference or see Help. For information about starting Help, see To Access Online Information.
Note: This section describes how to request control of a branch from another development site. Do not read this section unless your project manager or MultiSite administrator directs you to.
If your company uses MultiSite to distribute development among multiple geographical sites, you may share source files with developers at other sites. Each site has its own replica of the VOB, and developers work in their site-specific replica (known as the current replica). Each replica controls (masters) a particular branch of an element, and only developers at the site of that replica can work on that branch. In this scenario, MultiSite branch mastership does not affect you, and you can do your work as usual.
However, sometimes elements cannot have multiple branches. For example, some file types cannot be merged, so development must occur on a single branch. In this scenario, all developers must work on a single branch (usually, the main branch). MultiSite allows only one replica to master a branch at any given time. Therefore, if a developer at another site needs to work on the element, she must request mastership of the branch.
Note: The developer can also request mastership of branch types. For more information, see the Administrator’s Guide for Rational ClearCase MultiSite.
For example, the file doc_info.doc cannot be merged because it is a file type for which you do not have a type manager, but developers at different sites need to make changes to it. If the branch is mastered by your current replica, you can check out the file. If the branch is mastered by another replica, you cannot check out the file. If you try to check out the file, ClearCase presents an error message:
cleartool checkout –c "command changes" doc_info.doc
cleartool: Error: Cannot checkout branch "/main".
The branch is mastered by replica "sanfran_hub".
Current replica is "boston_hub".
cleartool: Error: Unable to check out "doc_info.doc".
For you to check out the file reserved or to check in the file after a nonmastered checkout, your current replica must master the branch. You can request mastership with a cleartool command.
If you have permission to request mastership from the master replica of the branch, if mastership requests are enabled, and if there are no blocking conditions, then the mastership change is made at the master replica, and a MultiSite update packet that contains the change is sent to your current replica. When your current replica imports the packet, it receives mastership of the branch and you can check out the file.
Note: Authorizing developers to request mastership and enabling mastership requests at a replica are tasks performed by the MultiSite administrator. For more information, see the Administrator’s Guide for Rational ClearCase MultiSite.
When you use mastership requests to transfer control of a branch, you can use either of two methods to do your work:
The following sections describe both methods.
cleartool reqmaster –c "add info re new operating systems"
read_me_first.doc@@/main
read_me_first.doc@@/main: Change of mastership at sibling replica
"sanfran_hub" was successful.
Mastership is in transit to the new master replica.
cleartool describe read_me_first.doc@@/main
branch "read_me_first.doc@@/main"
  created 15-May-99.13:32:05 by sg.user
  branch type: main
  master replica: boston_hub@/doc
...
In this example, your current replica is boston_hub in the VOB family /doc. The output of the describe command shows that boston_hub is the master replica of the branch, which means that you can check out the branch as reserved.
If you can merge versions of the element you need to check out, you can work on the file while you wait for mastership to be transferred to your replica.
To use this method from the command line:
cleartool reqmaster –c "fix bug #28386" prog.c@@/main/integ
prog.c@@/main/integ: Change of mastership at sibling replica
"lib_lex" was successful.
Mastership is in transit to the new master replica.
cleartool checkout –c "fix bug #28386" –unreserved –nmaster
prog.c@@/main/integ
cleartool describe /vobs/lib/prog.c@@/main
branch "/vobs/lib/prog.c@@/main"
  created 15-May-99.13:32:05 by nlg.user
  branch type: main
  master replica: lib_london@/vobs/lib
...
cleartool checkin –nc prog.c
Checked in "prog.c" version "/main/65".
If the checkin fails because you have to perform a merge, proceed to Step 6:
cleartool checkin –nc prog.c
cleartool: Error: The most recent version on branch "/main" is not
the predecessor of this version.
cleartool: Error: Unable to check in "prog.c".
cleartool merge –to prog.c –version /main/LATEST
(if necessary, you are prompted to resolve conflicts)
Moved contributor "prog.c" to "prog.c.contrib".
Output of merge is in "prog.c".
Recorded merge of "prog.c".
If the request for mastership fails because there are checkouts on the branch at the master replica, try your request again later or ask the other developer to check in the file or directory and then try again. If you receive other errors, contact your project manager or MultiSite administrator.