This chapter guides you through the everyday tasks of managing source files from Rational ClearCase:
Because snapshot views and dynamic views use different methods for creating directory trees, the procedure for accessing source files differs for the two view types.
Recall that when you create the view, ClearCase copies one version of each element specified by a load rule into your view. To access the files loaded into a snapshot view, open a shell and change to the root directory of the view.
For example, this command creates the snapshot view:
The files in the view are located in the ~/pat_v1.4_cropcircle_sv directory.
You can access someone else’s snapshot view as you would access any other directory on another workstation. Assuming that you can access the other workstation and that the owner of the directory has set up the proper permissions, use the cd command to access the view.
Accessing source files from a dynamic view entails two procedures:
Type this command:
cleartool setview view-tag
For more information about setting a view, see the setview reference page in the Command Reference.
Type this command:
cleartool mount VOB-tag
Usually, ClearCase mounts VOBs that were created with a public VOB tag when you start or reboot your workstation. If public VOBs do not mount, type cleartool mount –all to mount them.
VOBs remain mounted until you reboot your workstation or unmount them with the cleartool umount command. For more information about mounting VOBs, see the mount reference page in the Command Reference.
Team members can access any dynamic view by starting it on their computers. If you are unable to start or set a dynamic view that is on another host, check with your administrator to make sure that you can access the view storage directory for the view. For more information, see the Administrator’s Guide for Rational ClearCase.
To modify files and directories under ClearCase control, you must check them out. (Placing files and directories under source control is a separate procedure; see Adding Files and Directories to Source Control.) If you work in an environment with the base ClearCase-ClearQuest integration, you may have to perform additional steps (see Checking Out Elements in a VOB Enabled for ClearQuest).
cleartool checkout –query list-of-elements
ClearCase prompts you to enter a comment.
You can cancel the checkout operation by entering a standard interrupt signal such as CTRL+C before typing a period or pressing CTRL+D.
cleartool checkout includes several options. These are most commonly used:
–query
Detects potential problems in the checkout process caused by inappropriate config specs or out-of-date snapshot views and prompts for action.
–nc
Prevents ClearCase from prompting for a comment.
–cq
Prompts for and applies a comment to all elements in the list.
–unreserved
Makes the checkouts for the listed elements unreserved. For more information, see Reserved and Unreserved Checkouts.
For a complete description of all checkout options, see the checkout reference page in the Command Reference.
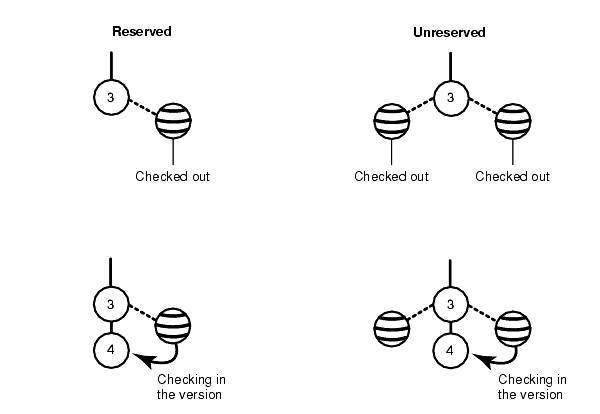
In some version-control systems, only one user at a time can reserve the right to create a new version. In other systems, many users can compete to create the same new version. ClearCase supports both models by allowing two kinds of checkouts: reserved and unreserved.
The view with a reserved checkout has the exclusive right to check in a new version for a given development project. Many views can have unreserved checkouts. An unreserved checkout does not guarantee the right to create the successor version. If several views have unreserved checkouts, the first view to check in the element creates the successor; developers working in other views must merge the checked-in changes into their own work before they can check in. The development policy of your organization may determine whether to check out reserved or unreserved.
Figure 34 illustrates checked-out versions created by reserved and unreserved checkouts, and the effects of subsequent checkins.
Another kind of checkout is an unreserved, nonmastered checkout, which can be used only in a replicated VOB (created with Rational ClearCase MultiSite). For more information about this kind of checkout, see Sharing Control of a Branch with Developers at Other Sites.
In the view, enter the reserve or unreserve command, as follows:
For information about changing the status for checkouts in other views, and for more information about these commands, see the reserve or unreserve reference pages in the Command Reference.
Because a snapshot view contains copies of files and directories, and a dynamic view provides access to data in VOBs, ClearCase follows different procedures for checking out from the different view types.
When you check out a file or directory from a snapshot view, the request is handled as follows:
The version in your view will not be the latest in the VOB if either of these conditions exist:
For information about checking out VOB links in a snapshot view, see Under the Hood: VOB Links.
When you check out a file from a dynamic view, ClearCase handles the request as follows:
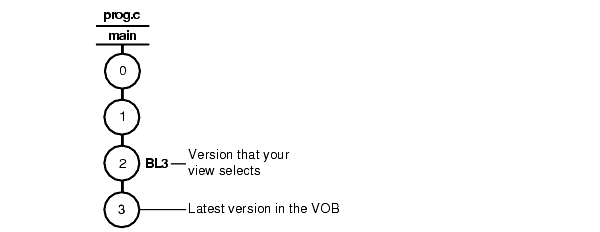
Your view may not select the latest version in the VOB if, for example, your config spec selects versions based on labels or time rules (Figure 35).
If you do not use the –query option, ClearCase checks out the latest version without notifying you. Use the –ver option of the checkout command to check out the version that your view selects, even if it is not the latest in the VOB.
For information about checking in a version that is not the latest on the branch, see Merging the Latest Version with Your Changes.
If the VOB in which you access versions is set up for the base ClearCase-ClearQuest integration, you may have to associate the version on which you are working with a ClearQuest record. For more information, see The Base ClearCase-ClearQuest Integration.
The first time that you attempt to check out an element from or check in an element to a VOB enabled for the base ClearCase-ClearQuest integration, you are prompted to log in to ClearQuest. Specify a ClearQuest user ID, password, and database name. ClearQuest keeps its own database of user IDs and passwords. Make sure that your ClearQuest administrator has added a user ID and password to the ClearQuest user database for you.
After you log in to ClearQuest, you can use the integration to complete your checkout and checkin operations (see Using the Modified Graphic User Interface). The integration stores the user ID and an encoded version of the password in a file named .cqparams, which it creates in platform-specific areas. On UNIX workstations, the file is stored in the home directory.
Thereafter, the integration uses the user ID and password in .cqparams instead of prompting you for them. If you change your password or connect to a different ClearQuest user database, the next time you check out or check in a version from that VOB, the integration displays an error message and prompts you to reenter the user ID and password. The integration updates the .cqparams file with the new information.
If you are logged in to a ClearQuest user database (see Logging On to a ClearQuest User Database) and check out or check in an element in a VOB enabled for ClearQuest, you see a modified interface, one for a graphic user interface or one for a command line interface. If you use File Browser, the Association dialog window opens (see Using the Modified Graphic User Interface). If you use a cleartool command line interface (CLI), you see a numbered menu (see Using the Modified Command Line Interface).
For the modified graphic user interface, the integration is based on a Perl trigger. The Association dialog window displays the result set of a standard ClearQuest query, usually showing all open change-request IDs currently assigned to you. If local policies allow, you can select alternative site-specific or ClearQuest-supplied queries to run.
Select an entry in the result set and click Associate to create an association between the versions you are checking out and the change request. If multiple selections are allowed on your project, select multiple entries. With at least one association, click OK to continue the checkout. To close the dialog box without making a change, click Cancel. For more information, click Help in the window.
For the modified cleartool command line interface, there are either text menus with numbered options or a clearprompt window showing the same menus. The options in the menus are shown in Table 4.
To run an option:
All menus accept a single choice, to which you can enter a number. TYPEIN allows multiple change-request IDs, separated by a space or a comma. The IDs can be full names (for example, SAMPL00056789) or numbers (for example, 56789).
To dismiss the menu without making a choice, simply press RETURN.
If you use the command line interface and are required to associate versions with change requests, use the options from Table 4 to enter change-request IDs as follows:
After you specify your options, use the OK option to create or update the associations that you specified and complete the checkout operation.
After you check out a version, you do not need to interact with ClearCase until you are ready to check in. However, some ClearCase tools can help you with the following tasks:
Some cleartool commands include a –graphical option, which starts a tool for completing the task. This chapter presents the –graphical option whenever it is available.
The History Browser displays the history of an element modifications, including version-creation comments (entered when someone checks out or checks in an element).
In a view, enter this command:
cleartool lshistory –graphical path
You can use this command from a snapshot view whether or not the element specified by path is loaded into the view.
As you modify source files, you may want to compare versions to answer such questions as these:
In a view, enter this command:
cleartool diff –graphical –predecessor path
To use the command line:
You can use the lsvtree and diff commands from a snapshot view whether or not the element specified by path is loaded into the view. For more information, see The Version-Extended Path.
Note: To use this procedure, your workstation must support dynamic views.
cleartool startview joe_v1.4_cropcircle
cleartool diff –graphical /guivob/prog.c /view/joe_v1.4_cropcircle/guivob/prog.c
Sometimes, the same element appears at different paths in different views. ClearCase can track directory-level changes, from simple renaming operations to wholesale reorganizations. In such situations, a team member may direct your attention to a particular element by using a path that is not valid in your view.
To determine the path in your own view, pass the path in the different view to a describe –cview command. For example:
cleartool describe –cview /view/joe_v1.4_cropcircle/project/include/lib.c
version "/guivob/lib.c@@/main/1"
  created 19-May-02.14:46:00 by rick (rick.devt@saturn)
  .
  .
You can then compare your version of the element with your team member’s version as follows:
Depending on how you work, you may forget exactly how many and which files are checked out. To list all the files and directories you currently have checked out to your view, access the view and use the lscheckout command with the following options:
cleartool lscheckout –cview –me –avobs
For more information, see the lscheckout reference page in the Command Reference or type cleartool man lscheckout in a shell.
Typically, when you are developing source files for a project, you want to perform prototype builds to test your modifications. If your organization uses clearmake, you can use this ClearCase build tool for your prototype builds; however, the build auditing and build avoidance features are available only from dynamic views.
For more information, see Building Software and the clearmake reference page in the Command Reference.
If you check out a file but do not want to check in your changes or want to start with a fresh copy, you can cancel the checkout as follows:
To avoid being prompted about saving modifications, use one of the following options with the uncheckout command:
–keep
Saves modifications
–rm
Does not save modifications. Any changes you made to the checked-out version are lost.
When you cancel the checkout of a file element, ClearCase handles the request as follows:
In a dynamic view, it uses the version-selection rules of the config spec to select a version.
If you work in an environment with the base ClearCase-ClearQuest integration, any associations with ClearQuest change requests you may have made at checkout (see Checking Out Elements in a VOB Enabled for ClearQuest) are canceled if you cancel the checkout.
When you cancel a directory checkout, ClearCase notifies the VOB that you no longer have the version of the directory checked out to your view. ClearCase does not prompt you to rename a canceled directory checkout to directory-name.keep.
If you cancel a directory checkout after changing its contents, any changes you made with cleartool rmname, mv, and ln are lost. Any new elements you created (with mkelem or mkdir) become orphaned. ClearCase moves orphaned elements (and any data that exists in the view at the path of the new element) to the lost+found directory in the VOB under names of this form:
element-name.UUID
In such cases, uncheckout displays this message:
cleartool: Warning: Object "prog.c" no longer referenced.
cleartool: Warning: Moving object to vob lost+found directory as
"prog.c.5f6815a0a2ce11cca54708006906af65".
In a snapshot view, ClearCase does not remove view-private objects or start the update operation for the directory in the view. To return the directory in your view to its state before you checked it out, you must start the Update Tool. For information about starting the Update Tool, see To Start the Update Tool.
In a dynamic view, ClearCase does not remove view-private objects, but it does revert the view to its previous state.
To move an element from the lost+found directory to another directory within the VOB, use the cleartool mv command. To move an element from the lost+found directory to another VOB, use the relocate command. For more information about moving elements to another VOB, see the relocate reference page in the Command Reference.
To permanently delete an element in the lost+found directory, take note of the name of the orphaned element and use this command:
cleartool rmelem VOB-path/lost+found/orphaned-element-name
For example, from a dynamic view:
From a snapshot view:
cd ~/pat_v1.4_cropcircle_sv cleartool rmelem guivob/lost+found/prog.c.5f6815a0a2ce11cca54708006906af65Note: In a snapshot view, ClearCase treats the lost+found directory, which is located immediately below the root directory of a VOB, as any other directory. To load the directory in your view, you must use a load rule that specifies either the parent directory of the element or the directory itself. However, as with any other directory in a snapshot view, you do not need to load the lost+found directory to issue ClearCase commands for elements in the directory.
Until you check in a file, ClearCase has no record of the work in your view. Checking in a file or directory element creates a new version in the VOB, which becomes a permanent part of the history of the element. We recommend that you check in a file or directory any time you want a record of its current state.
Ideally, the development strategy of your organization isolates your checked-in work from official builds and requires you to merge your work to official project versions at specified intervals.
cleartool checkin list-of-elements
ClearCase prompts you to append your checkout comments.
You may cancel the checkin operation by entering a standard interrupt signal such as CTRL+C before typing a period or pressing CTRL+D.
cleartool checkin includes several options. Here is a description of the most commonly used ones:
–nc
Prevents ClearCase from prompting for a comment.
–cq
Prompts for and appends a single additional comment to all elements in the list.
For a complete description of all checkout options, see the checkin reference page in the Command Reference.
If the version you checked out is not the latest version in the VOB and you try to check in your modifications, ClearCase requires you to merge the changes in the latest version into the version checked out in your view (Figure 36).
In Figure 36, version 2 of prog.c is the one that you checked out. Before you check in your modifications, someone else checks in version 3 of prog.c. When you check in your modifications, ClearCase tells you that the version you checked out is not latest on the branch. (For more information about situations in which you may have to merge before checking in, see Under the Hood: What Happens When You Check Out a File or Directory.) Note that the reserve status of the checkout is not relevant to whether your modifications can be checked in.
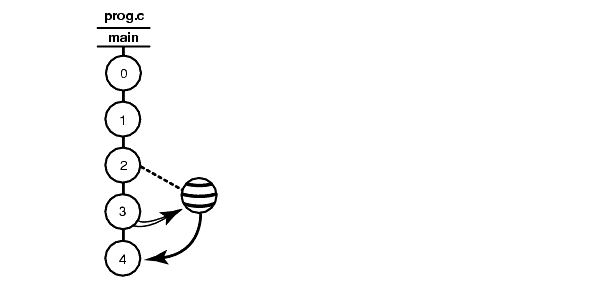
You need to merge the latest version in the VOB (prog.c@@/main/LATEST) to the version in your view before you can check in your modifications. This merge creates a version that reconciles modifications made in the latest version with your modifications. Then, when you check in the merge results, the system sees the merge arrow from version 3 to your checked-out version containing the merge results. The checkin creates a version 3 successor, version 4 of prog.c.
To merge the latest version in the VOB to the version in your view, enter the following command:
cleartool merge –graphical –to file-or-directory-in-your-view \
file-or-directory-name@@/main/LATEST
Note: @@/main/LATEST is a version-extended path. For more information, see The Version-Extended Path.
For example:
Using the –graphical option starts Diff Merge. For information about using Diff Merge, see Help in Diff Merge.
After merging, save the results and check in the version from the view (see To Check In Files).
The steps ClearCase follows when you issue the checkin command vary depending on the kind of view you use.
When you issue a checkin command from a snapshot view, ClearCase handles the request as follows:
For any other instance of a hard-linked file loaded into a snapshot view, ClearCase copies the new version from the VOB into your view. (If your load rules specify a hard-linked element that appears in more than one VOB location, the element is copied into each of the appropriate locations in the directory tree of your view.)
When you issue the checkin command from a dynamic view, ClearCase handles the request as follows:
If you use the base ClearCase-ClearQuest integration (see Checking Out Elements in a VOB Enabled for ClearQuest), the version you are checking in must be associated with at least one change request; otherwise, the checkin cannot proceed. When you check in the version, the base ClearCase-ClearQuest integration displays those change-request IDs whose associations you made during checkout. You can do the following:
The base ClearCase-ClearQuest integration creates associations for new change-request IDs that you add, removes associations for change-request IDs that you delete, and updates information on existing ones.
If you use File Browser, the Association dialog window appears. You can do the following:
In the Association dialog window, click OK to continue the checkin. For more information, click Help.
If you use a cleartool command line interface (CLI), you can do the following with the options in Table 4 :
If the associations are correct, use the OK option to continue the checkin.
To view the versions associated with a ClearQuest change request:
The ClearCase tab shows the last known names of the versions of ClearCase elements associated with the change request. Files without extended paths have not yet been checked in.