
Version 2 Release 1.0
SH26-4061-00
5765-C05
| Note |
|---|
|
Before using this information and the product it supports, read the general information under "Notices". |
First Edition (January 1997)
This edition applies to Version 2 Release 1 of the ADSMConnect Agent for Oracle7 Enterprise Backup Utility on AIX, 5765-C05, and to any subsequent releases until otherwise indicated in new editions. Make sure you are using the correct edition for the level of the product.
Order publications through your IBM representative or the IBM branch office serving your locality.
IBM welcomes your comments. You can send comments about this book to the following address:
International Business Machines CorporationYou can send us comments about this book electronically:
When you send information to IBM, you grant IBM a nonexclusive right to use or distribute the information in any way it believes appropriate without incurring any obligation to you.
© Copyright International Business Machines Corporation 1997. All rights reserved.
Note to U.S. government Users -- Documentation related to restricted rights -- Use, duplication or disclosure is subject to restrictions set forth in GSA ADP Schedule contract with IBM Corp.
Chapter 1. Installing the ADSMConnect Agent for Oracle Backup
Chapter 2. Setting Up the ADSMConnect Agent for Oracle Backup
Chapter 3. Using the ADSMConnect Agent for Oracle Backup
References in this publication to IBM products, programs, or services do not imply that IBM intends to make these available in all countries in which IBM operates. Any reference to an IBM product, program, or service is not intended to state or imply that only that IBM product, program, or service may be used. Any functionally equivalent product, program, or service that does not infringe upon any of the intellectual property rights of IBM may be used instead of the IBM product, program, or service. The evaluation and verification of operation in conjunction with other products, except those expressly designated by IBM, are the responsibility of the user.
IBM may have patents or pending patent applications covering subject matter in this document. The furnishing of this document does not give one any license to these patents. Send license inquiries, in writing, to the IBM Director of Licensing, IBM Corporation, 500 Columbus Avenue, Thornwood NY 10594-1907, USA.
Licensees of this program who wish to have information about it for the purpose of enabling: (i) the exchange of information between independently created programs and other programs (including this one) and (ii) the mutual use of the information that has been exchanged, should contact IBM Corporation, Information Enabling Requests, Dept. M13, 5600 Cottle Road, San Jose CA 95193-0001, USA. Such information may be available, subject to appropriate terms and conditions, including in some cases, payment of a fee.
The following terms are trademarks of the IBM Corporation in the United
States, other countries, or both:
| ADSMConnect Agent | OS/2 |
| ADSTAR | OS/400 |
| AIX | RISC System/6000 |
| IBM | VSE/ESA |
| MVS/ESA |
|
The following terms are trademarks of other companies:
| HP-UX | Hewlett-Packard Company |
| Oracle | Oracle Corporation |
| Oracle7 | Oracle Corporation |
| Oracle7 Enterprise Backup Utility | Oracle Corporation |
| Sun | Sun Microsystems, Inc. |
| Windows NT | Microsoft Corp. |
UNIX is a registered trademark in the United States and other countries licensed exclusively through X/Open Company Limited.
The ADSMConnect Agent* for Oracle7** Enterprise Backup Utility** on AIX* contains the library you will need to link with the Oracle7 Enterprise Backup Utility (EBU). Once the EBU is linked with this library, database objects can be sent to the configured ADSM server.
This publication describes the installation and operation instructions for the system administrator or user. You should be familiar with your AIX workstation, your operating system, and your file backup systems.
The following publications provide additional information.
| Title | Order Number |
|---|---|
| ADSTAR Distributed Storage Manager: Using the Application Programming Interface | SH26-4002 |
| ADSTAR Distributed Storage Manager: Installing the Clients | SH26-4049 |
| ADSTAR Distributed Storage Manager: Using the UNIX** Backup-Archive Clients | SH26-4053 |
| ADSTAR Distributed Storage Manager: Using the UNIX Hierarchical Storage Management Clients | SH26-4030 |
| Getting Started: Managing IBM RISC System/6000 | GC23-2378 |
| Using ADSM to Back Up Databases | SG24-4335 |
| Enterprise Backup Utility Installation Guide for AIX, Release 2.0.10 | A43148-1 |
| Oracle7 Server Administrator's Guide | 6694-70-1292 |
| Oracle7 Enterprise Backup Utility Administrator's Guide, Release 2 | A42580-2 |
| Oracle SQL Net Administrator's Guide | -- |
This chapter describes the installation procedures for the ADSMConnect Agent for Oracle Backup.
This section describes setup information to install the ADSMConnect Agent for Oracle Backup on an AIX workstation. See Chapter 2. "Setting Up the ADSMConnect Agent for Oracle Backup" for user task procedures.
Before you install the ADSMConnect Agent for Oracle Backup, make sure the following are installed first:
A root user must install the ADSMConnect Agent on an AIX workstation.
| Note: | Do not install the Oracle7 Enterprise Backup Utility (EBU) until after you install the ADSMConnect Agent for Oracle Backup. |
The hardware requirements are:
The software requirement is IBM AIX 3.2, or later.
Table 2. Communication Software
| To use this communication method: | Install this on the workstation | To connect to these ADSM servers: |
|---|---|---|
| TCP/IP | Standard with AIX/6000 | AIX, HP-UX, MVS, OS/2, OS/400, Sun, VM, Windows NT |
| SNA LU6.2 (APPC) | AIX SNA Services/6000 | AIX, MVS, OS/2, OS/400, VSE, VM |
The AIX 3.2 installation requires at least 3 MB of free disk space to install all available options. The AIX 4.1 installation requires at least 1 MB of free disk space to install all available options.
When you install the ADSMConnect Agent on an AIX workstation, all the of the ADSMConnect Agent files for the installed client components reside in /usr/lpp/adsmagent/aob.
To install the ADSMConnect Agent on an AIX workstation, use the System Management Interface Tool (SMIT). The AIX system supports two versions of SMIT: ASCII and Motif. With the ASCII version, select an item, and press Enter. With the Motif version, click on the item you want. The following procedures are written for the Motif version, but any significant differences for the ASCII version are noted.
For detailed information about using SMIT, see Getting Started: Managing IBM RISC System/6000, and read the SMIT windows during the installation process.
| Note: | Later versions of AIX incorporate slightly different SMIT screens than earlier versions. Where these differences exist, they are identified in the installation steps. |
The client program CD-ROM for both AIX 3.2 and AIX 4.1 contains the
following:
| Directory | Files |
|---|---|
| aix32 |
adsmaob.bff .toc |
| aix41 |
adsmaob.bff aobkey.bff .toc |
| doc |
adsmaob.list3270 adsmaob.listps |
Follow the steps below to install the ADSMConnect Agent for Oracle Backup program.
| Note: | If you are using the Motif version of SMIT, you must be in the X Window system environment. Enter xinit if you are not. |
mkdir /mnt
mount -o ro -v cdrfs /dev/cd0 /mnt
Enter smitty if you are using the ASCII version of SMIT.
| Note: | With the ASCII version, press F4 to select the software list. |
| Note: | With the ASCII version, press F7 to select the list. |
ARE YOU SURE?
Follow the steps below to install the ADSMConnect Agent for Oracle Backup.
| Note: | If you are using the Motif version of SMIT, you must be in the X Window System environment. Enter xinit if you are not. |
mkdir /mnt
mount -o ro -v cdrfs /dev/cd0 /mnt
Enter smitty if you are using the ASCII version of SMIT.
| Note: | With the ASCII version, press F4 to get the software list. |
| Note: | With the ASCII version, press F7 to select the list. |
ARE YOU SURE?
The following files are included with the ADSMConnect Agent for Oracle
Backup and are installed in the /usr/lpp/adsmagent/aob path.
| File Name | Description |
|---|---|
| adsmaob.ord | Verification file |
| dsm.opt.smp | Sample client user options file |
| dsm.sys.smp | Sample client system options file |
en_US/dsmclient.cat En_US/dsmclient.cat |
Messages (for 3.2 and 4.1) Messages (for 3.2) |
| libobk.a | Shared library |
| aobpswd | Password management program |
| options.doc | Documentation for client options |
| README.AOB | Recent updates and other special information |
| Note: | A symbolic link is made to associate libobk.a with /usr/lib/libobk.a. |
Once the ADSMConnect Agent for Oracle Backup is installed, you can install the Oracle Enterprise Backup Utility (EBU). See Enterprise Backup Utility Installation Guide for AIX for installation procedures.
To install the EBU executables so they work with ADSM, follow these steps:
| Note: | You can install it anywhere, but the directory name must be OBACKUP. The 3rd Party Media Management Software Vendor screen displays. |
/usr/lpp/adsmagent/aob
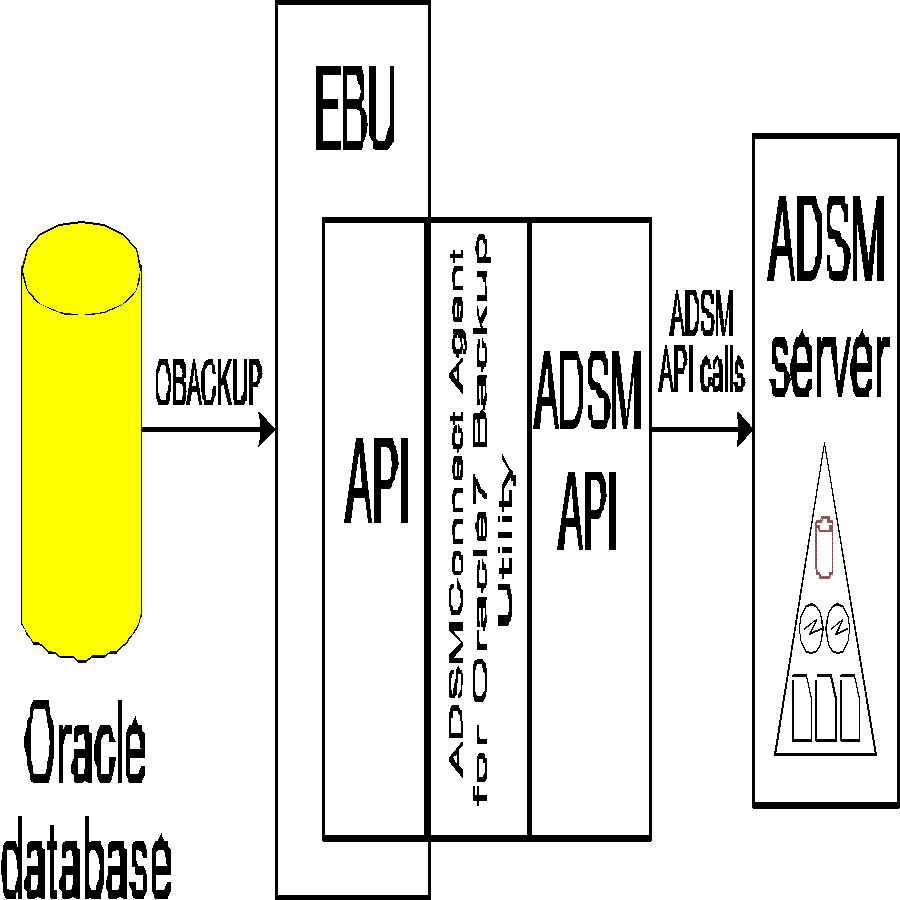
The ADSMConnect Agent for Oracle Backup is an application interface containing the library you will need to link with the Oracle7 Enterprise Backup Utility, Version 2. Once the Enterprise Backup Utility is linked with this library, database objects can be sent to the configured ADSM server. This application uses the ADSM API.
See Figure 1 for an understanding of how EBU works in conjunction with ADSM and the ADSMConnect Agent.
Figure 1. Oracle EBU Interface to ADSM Through the ADSMConnect Agent for Oracle Backup
View figure. |
This section describes the setup procedures for the ADSMConnect Agent for Oracle Backup. Check the current README.AOB for any changes. We recommend that you also refer to the publication, Using ADSM to Back Up Databases.
Before you begin using the ADSMConnect Agent for Oracle Backup, perform these setup tasks:
Instruct the ADSM administrator to register your node with the server and to inform you of the password. The administrator should specify BACKDELETE=yes so that you can delete old backups at a later time.
The root user should edit the dsm.sys file. It must refer to the correct ADSM server and communication option methods. Set the PASSWORDACCESS PROMPT option to prompt in the client system options (dsm.sys) file. Prompt is the default if a parameter is not specified.
The Oracle user should edit the dsm.opt file. The file should refer to the correct SERVERNAME.
The API uses unique environment variables to locate files. This allows you to use different files for API applications from those used by the interactive client, if necessary.
Specify the client system options file (dsm.sys), the client user options file (dsm.opt), and the API error log file (dsierror.log) that you want to use for the ADSMConnect Agent for Oracle Backup, using the DSMI_DIR, DSMI_CONFIG, and DSMI_LOG environment variables. See below for examples of how to specify these files.
The Oracle user must define the following environment variables.
If the dsm.opt file is in your home directory, use:
export DSMI_CONFIG=/home/yourlogin/dsm.opt
If these files are in the /usr/lpp/adsmagent/aob directory, use:
export DSMI_DIR=/usr/lpp/adsmagent/aob
For error log files, create a directory where you want the error logs to be created, and let the DSMI_LOG environment variable point to that directory.
If the error log directory is /home/yourlogin/logdir, use:
export DSMI_LOG=/home/yourlogin/logdir
Important: Set this environment variable to a value in the approximate range of your database sizes so the ADSM server can determine device usage.
export DSMO_FS=oracle
The default is the value returned by the gethostname or NODENAME value in the options file.
| Note: | We recommend that you do not use this environment variable. If necessary, however, it can be used to override the login userid to restore an object backed up by another owner. |
If the password file is in /usr/lpp/adsmagent/aob, use:
export DSMO_PSWDPATH=/usr/lpp/adsmagent/aob
Important: The root user must run the aobpswd program before using the ADSMConnect Agent for Oracle Backup.
Follow the steps below to initialize the password.
+--------------------------------------------------------------------------------+ � ADSMConnect Agent for Oracle Backup � �Password file authorization/update program � �>> this must be run by the ROOT user if updating the value << � +--------------------------------------------------------------------------------+
Enter your new password
press Enter without entering a value. The following messages are displayed:
+--------------------------------------------------------------------------------+ �Your password has been written to the file. � �Verify that the DBA has read access to the ADSMO.pigeon file. � +--------------------------------------------------------------------------------+
The aobpswd program creates a file called ADSMO.yourhostname in the directory specified by DSMO_PSWDPATH. Make sure the user who will run the ADSMConnect Agent for Oracle Backup has read permission to ADSMO.yourhostname.
You can use the aobpswd program at a later time to update the password. Update the password before it expires on the ADSM server.
When you back up a database, the default management class for your node will be used unless you override this with a different value specified in the include option. This option is placed in the include-exclude options file. The file name of the include-exclude options file is placed in the client systems option file. Refer to ADSTAR Distributed Storage Manager Installing the Clients.
For the management class you will use, define the backup copy group parameters VERDELETED=0 and RETONLY=0. This will aid in the cleanup of files that the obkcatutl command deletes.
The Oracle Enterprise Backup Utility (EBU) provides backup and restore functions for Oracle7 databases. You can perform full or partial, offline or online backups. Once you identify which database you want to back up, EBU locates all of the necessary files and sends them to ADSM. The ADSMConnect Agent for Oracle Backup provides an interface between the EBU API calls and the ADSM API routines. The ADSMConnect Agent for Oracle Backup translates the EBU commands into ADSM API calls. This section describes how to use the ADSMConnect Agent for Oracle Backup.
Use EBU command scripts to define and start backup and restore operations, or to register information in the Backup Catalog. To start the operations, enter the OBACKUP command followed by the appropriate script name. For example, to register databases in the Backup Catalog, use an OBACKUP register script.
To back up a database, use the OBACKUP scripts customized to execute the following tasks:
To restore a database, use OBACKUP scripts customized to execute the following tasks:
If a backup is interrupted, the operation starts from the interrupt point; not from the beginning.
The ADSMConnect Agent for Oracle Backup uses the ADSM backup repository. Each database backup creates a new object with a new unique name. Because these have unique names, they always remain active and never expire. This happens so the database administrator (DBA) can control when copies are removed from the ADSM server and can coordinate this with the Enterprise Backup Utility.
Oracle ships a utility called obkcatutl that should be used to delete old database backups no longer needed from the Backup Catalog. When backups are deleted from the Backup Catalog, EBU sends delete object API calls to ADSM. ADSM then marks the objects inactive to ensure they expire with the next ADSM file expiration process. For example, to delete backups that are older than 30 days, enter this command:
obkcatutl -db_name=xxxx -deljob=30
You can define obkcatutl commands as part of a script that is started from the ADSM central scheduler to automate the deletion process.
Use parameters in the Management Class definition to control when the inactive object expires on the ADSM server.
For the backup copy group, use:
  VERDELETED=0
  RETONLY=0
This erases the inactive objects from the server after the next inventory expiration.
In order to delete backup objects, the ADSM administrator must register your node by specifying BACKDELETE=yes.
Customers can take advantage of the HSM functions on the ADSM AIX client by ordering the optional Space Management feature. The use of the HSM functions on the ADSM AIX client can save space by archiving the redo log files to the ADSM server. This is a great benefit for an active database where the logs can get very large and become difficult to manage.
To use HSM with archive log files, the root user must perform the following tasks:
Specify the client system options file (dsm.sys) and the client user options file (dsm.opt) that you want to use for backups, using the DSM_CONFIG and DSM_DIR environment variables. See below for examples of how to specify these files.
export DSM_CONFIG=/usr/lpp/adsm/bin/dsm.opt
export DSM_DIR=/usr/lpp/adsm/bin
| Note: | Do not place a slash (/) at the end of the directory path. |
The list below provides a brief description of some important space management options you can set in your dsm.sys file.
The default is the server specified in the first stanza of the dsm.sys file. An example is:
defaultserver cougar
The default is the default server. An example is:
migrateserver pigeon
The OPTIONFORMAT option determines whether users must enter space management commands using the standard format for options (similar to the format used for backup-archive commands), or the short format (similar to the format used for UNIX commands). The default is STANDARD.
Modify the dsm.opt file to suit your needs.
Because you only want to migrate archive log and control files, it is best to exclude space management services from all the files except the files you want to migrate. If you do not use include-exclude options, HSM might automatically migrate system files whenever the disk space is filled up to its high threshold mark (this will affect performance).
It is recommended that you should back up the files before migrating them. A management class is provided with the server that requires backing up the files before migration. If the default management class to the machine does not provide backups required before migration facility, use the include-exclude file to assign a management class to the files.
To add space management to a file system or to update space management settings for a file system, enter the dsmmigfs command:
dsmmigfs add /u01
This command adds space management to file system /u01.
To meet the above requirements, use the inclexcl option, adding the following statement in a server stanza in your dsm.sys file:
inclexcl /u01/oracle/include.def
Then, edit this file:
/u01/oracle/include.def
To edit the include-exclude file, enter these commands:
  include /u01/oracle/dbs/arch
  exclude.spacemgmt /.../u01/.../
  include /u01/oracle/dbs/arch  migsel
The following is an explanation of these commands:
If the migrated files are referenced while the database is in use, they are recalled automatically and will occupy the space again. In order to prevent being recalled every time they are referenced, use the dsmattr command to change the attribute of the files. for example:
dsmattr -recallmode=readwithoutrecall arch1_290.dbf
The dsmattr command changes the attribute of the arch1_290.dbf file to readwithoutrecall. The readwithoutrecall attribute prevents the file from being restored to the disk if referencing to the file is for read only.
For more information on HSM, see ADSTAR Distributed Storage Manager Using the UNIX Hierarchical Storage Management Clients.
If you encounter a problem while using ADSMConnect Agent for Oracle Backup or if you cannot start ADSMConnect Agent for Oracle Backup, collect this information:
To create this file, enter:
set � grep DSMI > dsmo.env set � grep DSMO >> dsmo.env
query node <nodename> format=detail
If you start ADSMConnect Agent for Oracle Backup successfully and then encounter a problem, collect this information:
| Note: | Future releases of EBU might show the actual return code from the Media layer rather than the number 12. |
query actlog
See ADSTAR Distributed Storage Manager Using the Application Program Interface for application client return codes.
If you need ADSM customer assistance, call this number: 1-800-237-5511. Inform the customer service representative of the following information to determine the problem:
q status
what libobk.a
A string is displayed with the ADSM API library version.