
IBM Global Data Synchronization for WebSphere Product Center V1.3
User Guide – Supply Side
(1Sync support)
IBM Global Data Synchronization for WebSphere Product Center V1.3
User Guide – Supply Side
(1Sync support)
Note: Before using this information and the product it supports, read the information in “Notices” on page 97.
28 July, 2006
This edition of this document applies to IBM Global Data
Synchronization for WebSphere Product Center, version 1.3, and to all
subsequent releases and modifications until otherwise indicated in new editions.
© Copyright International Business Machines Corporations 2006. All rights reserved. Licensed Materials-Property of IBM
US Government Users Restricted Rights – Use, duplication or disclosure restricted by GSA ADP Schedule Contract with IBM Corp.
Table of Contents
IBM Global Data Synchronization for WebSphere Product Center application Business Processes
Item Synchronization through Data Pools
Item Synchronization through 1 Sync
Notifications for New Item Publication
Notifications for Initial Load Publication
Notifications for Item Synchronize Changes
Notifications for Item Link Add
Notifications for New Item Request
Notifications for Item Change Request
Notifications for Item Hierarchy Request
Notifications for Mass Item Request
Create Trade Item – Global Attribute Enrichment Turned Off
Create Trade Item – Variant Attribute Enrichment Turned Off
Create Trade Item – Approval Process Turned Off
Approve the Deletion of a Trade Item
When Creating a New Trade Item
Using the Create Hierarchy Link
Approve New/Modified Hierarchy
Approve Deleted Trade Item Links
Search Trade Items/Hierarchies
Search Trade Item Transactions
Ch 6 Managing Trading Partners
Notifications for New Trading Partner Requests
Notifications for Trading Partner Change Requests
Approve Modified Trading Partner
Delete Trading Partner - Draft Status
Delete Trading Partner – Approved Status
Approve Deleted Trading Partner
Search Trading Partner Transactions
Appendix B – Trade Item Statuses
Appendix E - Error and Confirmation Messages
Error and Confirmation Messages Generated by 1 Sync
Programming interface information
The objective of this guide is to facilitate the users to navigate through the IBM Global Data synchronization for WebSphere Product Center and identify and operate the main solution functionalities. The document guides you through the solution features using a step-by-step approach.
The intended audiences for this guide are manufacturers in the supply chain industry.
The following related Global Data Synchronization Supply documentation is also available:
· Installation, Configuration, and Administration Guide
· Release Notes
This document uses the following conventions:
|
Courier New font |
Indicates commands, directory names, user names, path names, and file names. |
|
Note |
Indicates important or clarifying information including exceptions, interdependencies, and special situations. |
|
Tip |
Indicates a helpful action that will simplify or streamline the current procedure. |
|
Bold font |
Indicates buttons, tabs, menus, and keyboard key names. For example, the Save button. |
|
Italics font |
Indicates page names. For example, the Login page. |
Global Data Synchronization is the process by which trading partners exchange basic information about products on an ongoing basis. The information can be on price, party, and other relationship-specific details. This process ensures that all stakeholders for a product are kept in “sync” about the latest information on the product.
Global Data Synchronization enables you to:
· Reduce costs and increase competitiveness through the efficient and accurate transfer and on-going synchronization of information.
· Lay the foundation for future supply chain collaboration initiatives, which require that trading partners are in “sync” on the basic product, price, party, and relationship specific information.
The IBM Global Data Synchronization for WebSphere Product Center application enables the supply side trading partner (manufacturer) to perform key business functions. These include:
· Managing information on trade items and trading partners
· Creating new items and trading partners
· Adding items to the data pool
· Editing existing information
· Publishing item information to trading partners
· Synchronizing item changes
· Generating business reports
· Viewing transaction details for various business processes
The item synchronization process makes item and party data available for everyone who has subscribed to that particular data on a global basis. It also provides global visibility of products and parties.
Item Synchronization Process
· The manufacturer publishes item information to the item's home data pool.
· The data pool sends very basic information about the item to the registry. The registry holds this basic information about all items and the location of each item's home data pool.
· The retailer uses the registry to locate an item (by GTIN or by classification). The registry returns the details of the item's home data pool.
· The trading partners synchronize item information between their respective data pools using a subscription/publication process. The same process applies for synchronizing party information, published by the manufacturer or the retailer, based on the GLN.
The IBM Global Data synchronization for WebSphere Product Center connects to 1 Sync data pool services to enable supply side trading partners to perform data synchronization
The following figure shows the process of item synchronization using 1 Sync Data Synchronization Network (TDSN).

Item Synchronization Using 1 Sync
Procedure
Step 1: The manufacturer adds new items to TDSN by sending the “Item Add” message. TDSN saves the new items and registers the items on the registry.
Step 2: The manufacturer creates item links between items to create item hierarchies by sending “Item Link” messages to TDSN.
Step 3: The retailer subscribes to the trade item by sending a Subscription message through the data pool it connects to. The data pool saves the subscription and forwards the subscription to TDSN.
Step 4: The manufacturer publishes the new item information to the retailer by sending an “Item Publication” message to TDSN. TDSN then creates an “Item Sync – New Item” message and sends it to the retailer’s data pool. The data pool receives the message, then creates and sends an “Item Add” message to the retailer.
Step 5: The retailer accepts the publication by sending an “Accept” authorization back to the data pool. This ensures that the retailer continues to receive publications related to that item. The data pool creates and sends the appropriate authorization message to TDSN. TDSN forwards it to the manufacturer.
Step 6: To publish an item modification, the manufacturer sends an “Item Modify” message with the changed information. TDSN registers the modification with the registry, then creates an “Item Sync – Modify Item” message and sends it to the retailer’s data pool. The data pool receives the change, creates an item change message and sends it to the retailer.
This completes the item synchronization process.
|
Term/Acronym |
Description |
|
CIC |
Catalog Item Confirmation – GS1 message used by Recipients to send confirmation messages back to the Source about particular items. A Confirmation message can be Accept, Review, Reject, or Synchronize. |
|
CIN |
Catalog Item Notification – GS1 message used to communicate item information. CIN is sent from a source data pool to a recipient data pool. |
|
CIP |
Catalog Item Publication – GS1 message used by a Source to publish items to a Recipient. |
|
CIS |
Catalog Item Subscription – GS1 message used by Recipients to subscribe to item information. |
|
CISR |
Catalog Item Subscription Response – GS1 message sent from the Recipient Data Pool to the Recipient to confirm that a subscription has been processed and will be sent to the Global Registry.
|
|
Data Pool |
Repository of data where trading partners can obtain, maintain, and exchange information on items and parties in a standard format. In this guide the term data pool implies the AGENTRICS data pool services. |
|
Global Attributes |
A global attribute indicates that the attribute is relevant for business cases around the world, and can only have a single value throughout the world. (For example, GTIN) |
|
Global-Local Attributes |
A global/local attribute indicates that the field is relevant for business cases around the world. Its definition is the same but may have a different value depending on the geography. (For example, VAT tax values, 1.00 in France, 1.05 in Belgium) |
|
Global Location Number (GLN) |
This is a unique 13-digit number used to identify a trade location. The first seven digits represent the Company prefix, the next five digits represent the trade location, and the last digit is the check digit. |
|
Global Trade Item Number (GTIN) |
This is a unique 14-digit number used to identify trade items. The first 13 digits represent the item reference number and the last digit is the check digit. |
|
GS1 Response Messages |
Response messages sent to confirm GS1 processing of the CIS, CIC, and RFCIN messages. GDS does not support these messages via the user interface today. However, with the correct profile setup at Agentrics, these messages can be stored and accessed in the document store. |
|
Information Provider (IP) |
Information provider indicates the information owner. For example, Distributor, broker, Manufacturer or Franchisee. The retailer could receive information from both sellers and this field indicates the information owner. |
|
Local Attributes |
A local attribute is only relevant in certain geographical areas, and the values may change based on where the product is offered for sale. (For example, green dot – only relevant in certain European countries.) |
|
Recipient |
Party responsible for subscribing and receiving items published to them by a Source. Recipient is also referred to as Buyer, Retailer or Demand-Side |
|
RFCIN |
Request for Catalog Item Notification – GS1 message used by a Recipient to request a copy of previously received items or to erase a rejected status on an item. |
|
Source |
Party responsible for creating and publishing items to Recipients. Also referred to as Supplier, Vender or Supply-Side. |
|
Target Market (TM)
|
Geographic areas in which a trade item is available for sale. |
|
Trade Item |
Any product or service for which there is a need to retrieve pre-defined information and that may be priced, ordered or invoiced at any point in any supply chain. |
|
Trading Partner |
A party to transactions in the supply chain, such as a |
This chapter describes the initial actions to be performed to start working with the solution, and provides basic navigational information.
Topics:
To log on to the solution:
1. Access the IBM Global Data Synchronization for WebSphere Product Center application. The Login page is displayed.

Login
2. Enter your user name and your password in the Username and Password fields respectively. Click Login. The Home page is displayed.

Home Page
Each of the modules are aligned with a user’s role and responsibility. Access to the various areas depends on the level of access assigned to your position and user ID.
This section describes the product layout and the methods you can use to navigate through the IBM Global Data Synchronization for WebSphere Product Center application.
The page comprises three segments:
· Top Navigation Bar
· Left Navigation Pane
· Task Area
Each segment provides you with several methods that allow you to access various pages and views.
Top Navigation Bar: This segment provides tabs that allow you to navigate between various tasks, such as Manage Items, Publish Items, and so on.
Left Navigation Pane: This segment is located on the left side of each page. It displays the quick links and quick search. It can also be customized to suit your preference.
Task Area: This is the largest segment on the page. When you select a tab or a link on any of the other segments, the related page where you can perform tasks is displayed here.
The segments are as shown.

Segments
This section provides information about the icons used in the solution.
|
Icon |
Name |
Description |
|
|
Calendar icon |
Use this icon to open a calendar and select a date. |
|
|
Dismiss icon |
Use this icon to dismiss a notification. |
|
|
Edit icon |
Use this icon to edit item or trading partner information |
|
|
Look Up icon |
Use this icon to select target markets and information providers. |
|
|
Next Step |
Use this icon to move to the next step. |
|
|
Previous Step |
Use this icon to move to the previous step. |
|
|
Refresh Icon |
Use this icon to refresh the list of notifications displayed on the notification pages. |
|
|
Temporary GTIN icon |
This icon represents a temporary GTIN. While creating an item, if the user does not specify a GTIN, then a temporary GTIN is created automatically by the application |
|
|
Undo Icon |
Use this button to undo the last action performed. |
|
|
View Details icon |
Use this icon to view the details of a trade item or trading partner. |
This chapter describes the home page of the IBM Global Data Synchronization for WebSphere Product Center application. This page acts as a dashboard that provides an overview of the number of notifications related to publications, trade items, and trading partners.
When you log on to the solution, the home page displays the number of notifications related to items, publications, and trading partners by default.
The home page displays the following tables:
· Publication Requests – This table displays the number of notifications that you have received or sent. This includes of notifications related to:
o New Item Publications
o Initial Load Publications
o Item Add
o Item Synchronize Changes
o Item Link Add
o Item Unlink
For more information on viewing details of publications, refer the Managing Publications chapter.
· Item Requests – This table displays the number of notifications received or sent for trade items/hierarchies. This includes notifications related to:
o New Item Request
o Item Change Request
o Item Hierarchy Request
o Mass Item Request
For more information on viewing details of items, refer the Managing Items chapter.
· Trading Partner Requests - This table displays the number of notifications received or sent for trading partners. This includes:
o New Trading Partner Request
o Trading Partner Change Request
For more information on viewing details of Trading Partners, refer the Managing Trading Partners chapter.
The Home page is as shown.
Home Page
You can click on each of the displayed links to view the related list of notifications. For example, if you click on the New Item Request link, the page that shows you the list of notifications for new item requests is displayed.
The IBM Global Data Synchronization for WebSphere Product Center application facilitates the publishing of new trade items and item hierarchies to trading partners. You can publish a trade item to the demand-side trading partner as a New Item or as an Initial Load. The trade items are published when the demand-side trading partner(s) sends a request for publication. Only those trade items that have been added to the data pool can be published.
Topics:
· Unlink
You can publish a new item, send an initial load, and synchronize item changes with the data pool from the Home page also. The tasks are displayed in Quick Links on the left navigation pane.
You can view all notifications related to publications in the Notifications page. This page contains the following tabs:
· New Item Publication
· Initial Load Publication
· Item Add
· Item Synchronize Changes
· Item Link Add
· Item Unlink
To view the list of notifications for each, click on the corresponding tab. The New Item Publication tab view is displayed by default.

New Item Publication - Notifications
Each notification is represented by a GTIN. To view the details of a notification, click on the notification message. The details of that notification are displayed.
Once the trading partner receives the publication for new item or for an initial load, they have to accept or reject the publication. If they accept the publication, the notification message “Publication Accepted” is received. If they reject the publication, the notification message “Publication Rejected” is received.
The types of notifications that you can receive for new item requests are:
· New Item Successful Publication
· New Item Failed Publication
· Publication Accepted
· Publication Rejected
The types of notifications that you can receive for initial load are:
· Initial Load Failed
· Initial Load Successful
The types of notifications that you can receive for item add are:
· Successful Item Add
· Failed Item Add
The types of notifications that you can receive for item synchronize changes are:
· Successful Item Modify
· Failed Item Modify
· Successful Item Correction
· Failed Item Correction
The types of notifications that you can receive for item link add are:
· Successful Link Add
· Failed Link Add
The Types of notifications you can receive for item unlink are:
· Successful Item Unlink
· Failed Item Unlink
· Successful Item Unlink but Link Locked
A trade item that has not yet been published to any trading partner is called a new item.
Choose the demand side trading partner to whom you want to publish the item. The trade item(s) that can be published to the selected trading partner are displayed.
Publishing a new trade item comprises four steps:
· Choose Target – Select the trading partner to whom you want to publish the item.
· Select Items – Select the trade item(s) that are to be published.
· Cascade and Date – Select whether you want to publish the item hierarchy or only the trade item, and set the publication date.
· Review and Commit – Review the list of trade items and trading partners that you have selected, and commit the same for publication.
Each of the above steps is listed in the left pane. A tick mark is displayed against a completed step.
To publish a new trade item:
1. Go to Publish Items>Publish New Item. The Publish new item -> Select partners page is displayed.
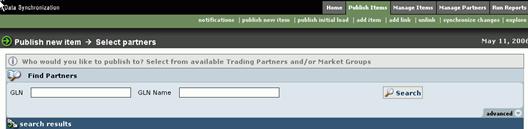
Publish New Item – Select Partners
3. Search for the trading partners to whom you want to publish the item. The search results are displayed in the search results area. For information about performing the search, refer the Explore section in this chapter
4.
From the list of the displayed trading partners, choose the
demand-side trading partner to whom you want to publish the trade item, and
then click ![]() . The Select Items to
Publish page is displayed.
. The Select Items to
Publish page is displayed.
5. Search for the trade item(s) that you want to publish. The search results are displayed in the search results area. For information about performing the search, refer to the Explore section in this chapter

6.
From the list of displayed trade items, select the trade item(s)
that you want to publish. Use the Next Page ![]() or Previous page
or Previous page ![]() buttons to view
all available trade items.
buttons to view
all available trade items.
Note: The number of trade items per page can be set during configuration of GDS in gds.properties.
7.
Click ![]() . The Set Cascade Option &
Date page is displayed.
. The Set Cascade Option &
Date page is displayed.

Publish New Item – Set Cascade Option & Date
8.
If you want to publish the entire item hierarchy instead of just
the highest level, select Yes from the drop-down menu. If not, select No.
Select a date to publish the new item using the Calendar icon ![]() and
click
and
click ![]() . The Review Publication
Summary and Send page displays the selected items and the trading partners.
. The Review Publication
Summary and Send page displays the selected items and the trading partners.

9.
Click ![]() . The trade items are published
to the trading partners and you receive the notification message “New Item
Successful Publication”. If the publication is not sent successfully, you
receive the notification message “New Item Failed Publication”. The
notifications are displayed in the Publications tab view.
. The trade items are published
to the trading partners and you receive the notification message “New Item
Successful Publication”. If the publication is not sent successfully, you
receive the notification message “New Item Failed Publication”. The
notifications are displayed in the Publications tab view.
The first synchronization message that is sent for a trade item that has already been published to a trading partner is called an Initial Load.
The initial load will detail all the changes that have been made to a trade item or item hierarchy.
An initial load can be published in two ways:
· Choose the demand side trading partner to whom you want to publish the item. The trade items that can be published to the selected trading partner are displayed.
Publishing an initial load comprises four steps:
· Choose Target – Select the trading partner to whom you want to publish the item as an initial load.
· Select Items – Select the trade item(s) that are to be published.
· Cascade and Date – Select whether you want to publish the trade item hierarchy or only the trade item, and set the publication date.
· Review and Commit – Review the list of trade item(s) and trading partners that you have selected, and commit the same for publication.
Each of the above steps is listed in the left pane of the screen. A tick mark is displayed against a completed step.
To publish an initial load:
1. Go to Publish>send initial load. The Send Initial Load-> Select Partners page is displayed.

Send Initial Load – Select Partners
2. Search for the trading partners to whom you want to publish the trade item. The search results are displayed in the search results area. For information about performing the search, refer to the Explore section in this chapter
3.
From the list of the displayed GLNs, choose the demand-side
trading partner to whom you want to publish to and click![]() . The Select
Items for Initial Load page is displayed.
. The Select
Items for Initial Load page is displayed.

4. Type in the search values to search for the trade item and click Search. The search results are displayed in the search results area. For information about performing the search, refer to the Explore section in this chapter
5.
From the list of displayed trade items, select the trade item(s)
that you want to send as an initial load and click ![]() The Pick Cascade
Option page is displayed.
The Pick Cascade
Option page is displayed.

Send Initial Load – Set Cascade Option&Date
6.
If you want to send the entire trade item(s) hierarchy instead of
just the highest level, select Yes from the drop-down menu. Otherwise
select No. Click ![]() . Select a date using the Calendar
icon
. Select a date using the Calendar
icon![]() and click
and click ![]() This is the date when the data
pool processes the message received for sending an Initial Load. The Review
Publication Summary and Send page displays the selected trade items and the
trading partners.
This is the date when the data
pool processes the message received for sending an Initial Load. The Review
Publication Summary and Send page displays the selected trade items and the
trading partners.

7. Click Send Initial Load. The trade item(s) are published to the trading partners and you receive the notification message “Initial Load Successful”. If the publication is not sent successfully, you receive the notification message “Initial Load Failed”. The notifications are displayed in the Initial Load Publication tab view.
You can add trade items to the data pool, if they are in the “Approved” status. When the trade item is approved for registration, you have to add it to the data pool.
To add trade items to the data pool:
1. Go to Publish Items>add item. The Add Item->Select Items page is displayed.

Add Item - Select Items
2. Search for the trade item(s). The search results are displayed in the search results area. For more information on performing a search, refer to the Explore section in this chapter
3.
Select the trade item(s) that you want to add and click![]() The
Set Date page is displayed.
The
Set Date page is displayed.

Add Item – Set Date
4.
Select the date using the Calendar icon ![]() and click
and click ![]() This
is the date when the data pool processes the message for adding the trade item.
The Review Item Add Summary and Send page displays the selected trade
item(s) and the date.
This
is the date when the data pool processes the message for adding the trade item.
The Review Item Add Summary and Send page displays the selected trade
item(s) and the date.
5. Review the list of trade item(s), and click Add Item(s). The trade item(s) are added to the data pool and the notification message “Successful Item Add” is received. If the trade item(s) is not sent successfully, the notification message “Failed Item Add” is received. The notifications are displayed in the Item Add tab view.
To add trade item links to the data pool:
1. Go to Publish Items>Add Link. The Add Item Link->Select Item page is displayed.

Add Item Link – Select Item
2.
Search for the trade item for which you want to add the links.
The search results are displayed in the search results area. For
information about performing the search, refer to the Explore section in this
chapter. Click on a trade item for which you want to add the links and
click ![]() . The Select Parent/Child of
Link page is displayed.
. The Select Parent/Child of
Link page is displayed.
3.
Select the child link(s) that you want to add and click![]() .
The Select Date to Add Item Link page is displayed.
.
The Select Date to Add Item Link page is displayed.
Note: 1 Sync supports adding of child links at IP level; all child links with common information providers will be displayed.
4.
Select the date using the Calendar icon![]() to specify when
the data pool will process the message and click Next. The Review
Item Link Add Summary and Send page is displayed.
to specify when
the data pool will process the message and click Next. The Review
Item Link Add Summary and Send page is displayed.

Review Item Link Add Summary and Send
5. Review the list of links, and click Add Item Links. The links are added to the data pool and you receive the notification message “Successful Link Add”. If the trade item link(s) is not sent successfully, you receive the notification message “Failed Link Add”. The notifications are displayed in the Item Link Add tab view.
To remove trade item links go to:
Go to Publish Items>unlink. The Item Unlink->Select Item page is displayed.

Search for the trade items that are part of a link that are eligible for unlinking. The search results are displayed in the search results area. For information about performing the search, refer to the Explore section in this chapter.
Click on a trade item for which you want to unlink and
click ![]() .
.
Note: If the GTIN is a parent GTIN, the Child GTIN and Information Provider are displayed. If the GTIN you selected is a Child GTIN, the parent GTIN and Information Provider are displayed.
Select the child or parent link with the Information
Provider that you want to unlink and click![]() . The Summary page is
displayed.
. The Summary page is
displayed.

Item Unlink > Summary
Review the list of links, and click Unlink Item Links. If the unlink(s) is successful, the links are removed from the data pool and you will receive the notification message “Successful Unlink”.
If the Link is checked out, a notification saying “Unlink successful but link locked” message is received. Go to Edit Hierarchy and check in the link.
If the trade item unlink(s) is not successful, you receive the notification message “Unlink Failed”. The notifications are displayed in the Item Unlink tab view.
You can synchronize changes for only those trade item(s) that have already been registered with the data pool and have been modified.
To synchronize item changes with the data pool:
1. In the Publish tab view, click on the synchronize changes link. The Select Items to Synchronize page is displayed.
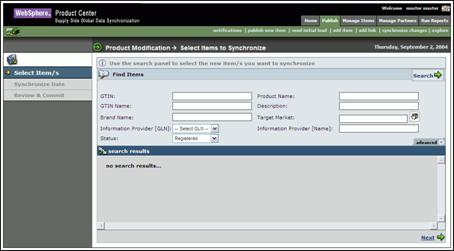
Select Items to Synchronize
2. Search for the trade item(s) that you want to synchronize. The search results are displayed in the search results area.
3. Select the trade item(s) and click Next. The Pick Synchronize date page is displayed.

Pick Synchronize Date
4.
In the Set Publication Date field, type the date when the
data pool will synchronize the modified trade item. The date format is
mm/dd/yyyy. You can also select the date using the Calendar icon![]() .
.
5. Select Item Modify or Item Append in the Set Synchronization Type field
6. Click Next. The Review Synchronization Summary and Send page is displayed.

Review Item Link Add Summary and Send
7. Review the list of trade item(s), and click Synchronize Changes. Once the data pool synchronizes these changes, the notification messages are received based on the attribute value that has changed. There are two scenarios:
· The data pool has certain mandatory attributes. If you change the value of any of the mandatory attributes, then the notification message “Successful Item Correction “is received. If the trade item is not sent successfully, you receive the notification message “Failed Item Correction”.
· If you change the value of any other attributes other than the mandatory attributes, the notification message “Successful Item Modification” is received. If the trade item is not sent successfully, you receive the notification message “Failed Item Modification”.
These notifications are displayed in the Item Change Synchronize tab view.
The IBM Global Data Synchronization for WebSphere Product Center application offers three search options:
· Quick Search - The Quick Search option is displayed in the left navigation pane on all the main pages. You can search by object or by attributes.

· Basic Search – The Basic Search option is displayed by default when you access a search page. This allows you to search for information related to the section you are currently working on. For example, Manage Trade items section.
· Advanced Search – The Advanced Search option allows you to perform a more detailed search.
1. Go to Publish Items>Explore. The Explore Transactions page is displayed.

Explore Transactions
2. You can type search parameters in any or all the following fields:
a. In the Transaction ID field, type the ID of the publication that you want to search for.
b. From the Transaction Process drop-down menu, select the type of transaction. Options available are Add Item, Add Item Link, Item Unlink, Publish Initial Load, Publish New Item and Synchronize Changes.
c.
In the Date range from and to fields, select the dates
using the Calendar icon![]() .
.
d. In the Transaction Status drop down menu, select from the following options: Pending, Registered, Registered GS1, Rejected, Submitted for Registration.
3. Click Search. The search results are displayed in the search results area.
4. Click on any transactions to view the details. The Transaction Detail page is displayed.
Ch 5 Managing Trade Items
This chapter describes the various tasks related to managing trade items within the IBM Global Data Synchronization for WebSphere Product Center application.
Topics:
· Explore
You can create and edit trade items from the Home page. The tasks are displayed in Quick Tasks on the left navigation pane.

You can view all notifications related to trade item requests in the Notifications page. This page contains the following tabs:
· New Item Request
· Item Change Request
· Item Hierarchy Request
· Mass Item Request

To view the list of notifications for each, click on the corresponding tab. The New Item Request tab view is displayed by default.
Each notification is represented by a GTIN. To view the details of a notification, click on the notification. The details of that notification are displayed.
The types of notifications that you can receive for new item request are:
· Item Variant Attribute Enrichment Pending
· Item Variant Attribute Enrichment Completed
· Item Global Attribute Enrichment Pending
· Item Global Attribute Enrichment Completed
· Item Variant Creation Pending
· New Item Approval Pending
· New Item Approved
· New Item Creation Rejected
The types of notifications that you can receive for item change request are:
· Modify Item Approval Pending
· Modify Item Approved
· Modify Item Rejected
· Item Deletion Approval Pending
· Item Deletion Approved
· Item Deletion Rejected
The types of notifications that you can receive for item hierarchy request are:
· Item Link Approval Pending
· Item Link Approved
· Item Link Rejected
The types of notifications that you can receive for Mass Item requests are:
§ Mass Global Enrichment
§ Mass Local Enrichment
§ Mass Approval
You can create a trade item by providing basic information about the trade item. This creates a working record of that trade item. You can then submit the trade item for enrichment. Users from different departments can then add to the working record by providing additional information about that trade item.
The trade item is validated and a working record is stored in the trade item repository of the IBM Global Data Synchronization for WebSphere Product Center application.
To create a trade item:
1. Create GTIN
5. Submit for Compliance Check
During solution setup, you have the option to turn on/off the global attributes enrichment process, variant attribute enrichment process, and the approval process. For more information, refer the IBM Global Data Synchronization for WebSphere Product Center application Installation and Configuration Guide.
The process of creating a trade item when global enrichment, variant enrichment or the approval process turned off is explained in the later part of this section.
To create the GTIN:
1. Go to Manage Items>Create Item. The Create Item page is displayed.
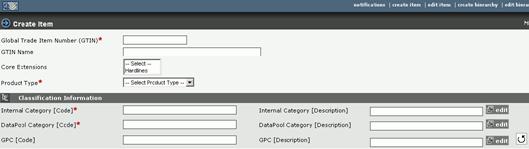
Manage Items – Create Item
2. In the Global Trade Item Number (GTIN) field, type the Global Trade Item Number for the trade item.
3. In the GTIN Name field, type the name of the trade item.
4. Select Hardlines in the Core Extensions field to display additional attributes
5. From the Product Type drop-down menu, select the type of product. Options available are: Each, Package, Case, Display/Shipper, Pallet and Mod Pallet (Mixed).
6. Under Classification Information:
Depending on the classification scheme configured there are three types of classification schemes.
If internal classification scheme is set to internal hierarchy, the user has his own way of classifying the items. The following categories will be displayed while creating an item
· Internal Category
· Datapool Category
· GPC
If the internal classification is set to UDEX, the user has opted for UDEX classification and he does not have his own way of classifying the items. The following categories will be displayed while creating an item.
· Internal Category (which will be the UDEX Category)
· GPC
If the internal classification is set to GPC, then the user has opted for GPC classification and he does not have his own way of classifying items The following categories will be displayed while creating an item.
· Internal category (set to GPC)
· Data Pool category (UDEX category)
To specify the code:
a. Specify the code and the description for the internal category. To do this, click edit. The Internal Classification List View is displayed.

Internal Classification List View
b. Click on the category code. The Internal Classification List View is closed. The category code and the description for that category are automatically displayed in the Internal Category [Code] and Internal Category [Description] fields.
c. You can also select the category code from the tree view. Click on the Internal Classification Tree View tab. The Internal Classification Tree View is displayed.

Internal Classification Tree View
d. Specify the code and the description for data pool category. To do this, click edit. The UDEX List View is displayed.

UDEX List View
e. Click on the category code. The UDEX List View is closed. The category code and the description for that category are automatically displayed in the DataPool Category [Code] and DataPool Category [Description] fields.
f. If the manufacturer is GS1 enabled then a third classification called Global Product Classification (GPC) has to be specified. To specify the GPC code select edit and the GPC list view is displayed

GPC List View
g. Click on the GPC code. The GPC List View is closed. The GPC code and the description for that category are automatically displayed in the GPC [Code] and GPC Category [Description] fields. It is mandatory if the supplier is GS1 enabled.
7. Click Create GTIN. The GTIN is created and the message “Item global information created successfully” is displayed along with additional fields.
8. You can enrich the global attributes or send the trade item for global enrichment. You have to enter values in all the mandatory fields before submitting for enrichment. For information about enriching global attributes, refer the section “Enrich Global Attributes”.
9. To submit the trade item for global enrichment, click Submit Global Attributes for Enrichment. The notification message “Item Global Attribute Enrichment Pending” is sent to the appropriate user(s).
To enrich the global attributes:
1. In the New Item Request tab view, click on the notification “Item Global Attribute Enrichment Pending”. The details of the notification are displayed.

2. From the Language drop-down menu, select the language in which you want the language specific attributes to appear.
3. In the Brand Description field, type a description for the brand.
4. In the Brand Name field, type the brand name of the product.
Note: You cannot modify the Classification Code information when you are enriching the global attributes.
5. Under Global Organization Information:
a. In the Owning Organization field, type the GLN used to identify the owner of the brand. (A brand is owned by a particular organization.) This should be a 13-digit number.
b. In the Owning Organization Name field, type the name of the party that owns the brand.
6. Under Global:
a. In the Size (Metric) field, from the NONE drop-down menu, select the unit of measure in metric units. It indicates the metric net content of the trade item as it appears or is printed on the packaging. This field is required if you select True for Base Unit Indicator field.
b. In the Size (Imperial) field, from the NONE drop-down menu, select the unit of measure in imperial units. It indicates the imperial net content of the trade item as it appears or is printed on the packaging. This field is required if you select True for Base Unit Indicator field.
c. In the Packaging Type field, specify the type of packaging used for the product.
d. In the Pack field, type the number of packs that this trade item contains.
e. In the Inner Pack field, type the number of inner packs. Inner Pack indicates the number of physical groupings (inner packs) of next lower level trade items within the current level. An Inner Pack can only contain the same GTIN, and Inner Pack sizing must be constant.
f. In the Product Form field, type the form of the product.
g. From the Base Unit Indicator drop-down menu, select the True or False. Indicates whether a trade item is (true) a base unit or not (false).
h. From the Consumer Unit Indicator drop-down menu, select True or False to indicate if the current hierarchy level of the trade item is intended for ultimate consumption or not.
i. From the Variable Weight Trade Item drop-down menu, select True or False to indicate if the weight of the trade item is variable or fixed.
j. In the Number of Complete Layers Cont in Item/GTIN Pallet H1 field, type the number of layers in a pallet.
k. In the Number of Items in a Complete Layer/GTIN Pallet T1 field, type the number of cases in a layer.
l. In the Storage/Handling Temp Max field, type the maximum temperature at which the product can be stored or transported.
m. In the Storage/Handling Temp Min field, type the minimum temperature at which the product can be stored or transported.
n. In the Packaging Material Type field, type the material used for packaging.
o. From the Own Label/Private Label drop-down menu, select True or False to indicate if a trade item is a private label or not.
p. In the Number of Items per Pallet field, type the number of trade items in the pallet. This field describes the highest-level trade item in a hierarchy that does not have a pallet trade item. Do not type any value, if Product Type is PL (Pallet).
q. In the Special Items Code field, type the code if any.
r. In the Cancelled Date field, type in the cancelled date, if any or look up the date by clicking on the Calender icon
7. If you want to create trade item links, click on the Item Links tab. For more information, refer Create Item Links section. This is optional.
8. Click Done. The notification “Item Global Attribute Enrichment Completed” is sent to the appropriate user(s). The notification is displayed in the New Item Request tab view.
Note: If the notification for enriching the global attributes is sent to more than one person, then only after all the persons responsible for enrichment clicks Done, the notification “Item Global Attribute Enrichment Completed” is sent.
If only one person is responsible for enriching the global attributes, then once the enrichment is complete, the notification is sent.
To create a Trade Item Variant:
1. In the Manage Items tab view, click on the edit item link. The Search Item page is displayed.

2. Search for the trade item. For information on performing the search, refer to the Explore section in this chapter. The search results are displayed in the search results area.
3. Click on the GTIN for which you want to create the variant. The details of the GTIN are displayed.
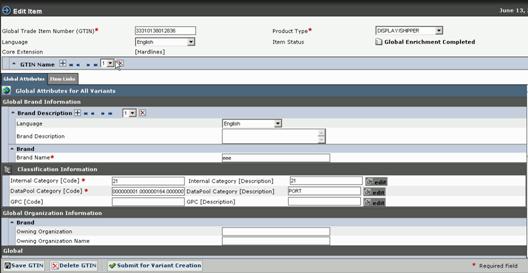
4. Click Submit For Variant Creation. The notification “Item Variant Creation Pending” is sent to the appropriate user to create the variant and the notification is displayed in the New Item Request tab view.

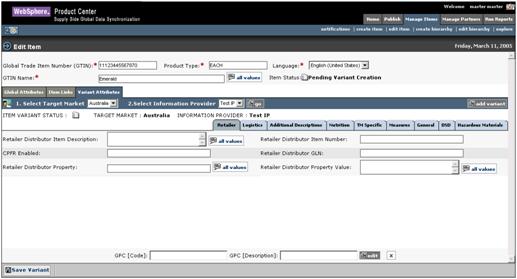
Create Item Variant
5. When the appropriate user receives this notification, click on the notification message. The Variant Attributes tab view is displayed.
6.
Click ![]() . The Add Variant dialog
box is displayed.
. The Add Variant dialog
box is displayed.

Add Variant
7. To add a target market:
a. Click
on the Look Up icon![]() . The Target Market Search
page is displayed.
. The Target Market Search
page is displayed.

Target Market Search
b. You have two options:
i. In the Search String field, type the name or first letter of the target market along with the asterisk (*) and click Search. The search results are displayed in the search results area.
ii. Click on the alphabet from which the name of the target market starts. For example, if the Target Market is Venezuela, click V. All target markets that start with the letter V is displayed in the search results area.

Target Market Search Results
c.
Select the target market and click ![]() . The Target
Market Search page closes and the selected target market is displayed in
the Target Market field.
. The Target
Market Search page closes and the selected target market is displayed in
the Target Market field.
8. To add the IP GLN:
a.
Click on the Look Up icon![]() . The Information Provider
Search page is displayed.
. The Information Provider
Search page is displayed.

Information Provider - Search
b. Perform the search to display the search results. For more information about search, refer to the Explore section in this chapter.

Information Provider – Search Results
c. Select the GLN and click Next. The Information Provider Search page closes and the selected GLN is displayed in the IP GLN field.
9. Click Next. The Add Variant dialog box closes and the variant is displayed in the Select Target Market and Select Information Provider drop-down menus in the TM/IP Attributes tab view. The screen is refreshed and the attributes for the selected target market and information provider is displayed.
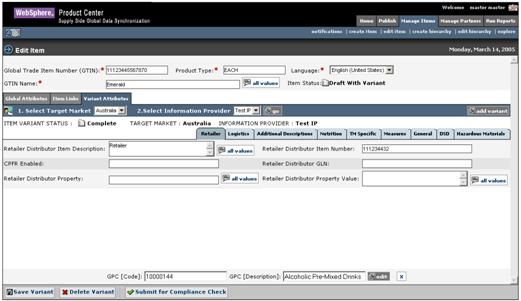
Save Variant
10. Click Save Variant. The screen that allows you to submit this variant for enrichment is displayed.

11. Click Submit This Variant for Enrichment. The notification message “Item Variant Attribute Enrichment Pending “is sent to the appropriate user(s) to enrich the variant attributes.
Note: If you have access to enrich the local attributes, you can fill in values in the various fields and then click on Submit This Variant for Enrichment for other users to enrich the same.
If the Interoperability attribute is enabled during configuration, then when you click Add Variant (Step 6), the Add Variant dialog box displays the Interoperability option as shown.
Add Variant
If you select the UDEX UK option, then once the variant is created, the UDEX UK Interoperability Attributes tab is also displayed along with the additional tabs (Step 9).
If you select the WWRE option, then once the variant is created, the WWRE interoperability attributes is also displayed along with the additional tabs (Step 9).
IBM Global Data Synchronization for WebSphere Product Center application enables users from different functional departments to add to the working record of a trade item. For example, a user can enter the Logistics attributes of the trade item from the Logistics department.
When a trade item is submitted for enrichment, the appropriate user(s) are notified to enrich the trade item. You can enrich the TM/IP attributes for a trade item. These attributes are configurable. The system administrator can configure them. For information about configuring these attributes, refer the IBM Global Data Synchronization for WebSphere Product Center application Installation and Configuration Guide.
The enriched trade item is validated to ensure that it complies with the data pool data validation rules. Once validated, it is approved by the appropriate user(s) before it is added to the data pool (TDSN).
To enrich local attributes:
1. In the New Item Request tab view, click on the notification “Item Variant Attribute Enrichment Pending”. The Variant Attributes tab view is displayed. This tab view contains the tabs that are specific to your role.

Specific variant attributes Tabs
2. Type in the values for the fields in the various tabs and click Done. The notification “Item Variant Attribute Enrichment Completed” is sent to the appropriate user.
Note: If the supplier is GS1 enabled then he has an option to enter the GPC code and description for that particular variant.
Note: The notification is sent only when all the users who are responsible for enriching the variant attribute clicks Done.
If you are not ready to commit the enrichment, click Save Variant Data. This saves a draft copy of the trade item.
Once the enrichment is complete, the trade item details have to be checked for compliance. This is an internal validation that is performed to check if the values that have been entered meet the data pool validation rules. The data pool validation rules are pre-seeded. They can also be configured.
To submit a trade item for compliance check:
1. In the Manage Items tab view, click on the edit items link. The Search page is displayed.
2. Search for the trade item that you have to send for compliance check. For more information about performing the search, refer to the Explore section in this chapter. The search results are displayed in the search results area.
3. Click on the trade item that you want to submit for compliance check.

4. Go to the Variant Attribute tab. Click on the go button, which is next to the Target Market and Information Provider drop down.
5. Click Submit for Compliance Check. An internal validation is performed on the values that have been entered for the various fields.
If it is compliant with the data pool validation rules,
the page that allows you to submit the trade item for approval is displayed.
Also the ![]() icon is displayed to notify you
that the trade item is compliant with the data pool validation rules.
icon is displayed to notify you
that the trade item is compliant with the data pool validation rules.
If not, a blinking Error icon ![]() is displayed. The error
messages are displayed in red for the fields that need the correct values. You
have to fix the errors and resend the trade item for compliance check.
is displayed. The error
messages are displayed in red for the fields that need the correct values. You
have to fix the errors and resend the trade item for compliance check.
Once the trade item passes the compliance check, it has to be approved internally by the appropriate user before it is registered with the data pool.
To submit a trade item for approval:
1. In the Manage Items tab view, click on the edit items link. The Search page is displayed.
2. Search for the trade item that you have to send for approval. For more information about performing the search, refer to the Explore section in this chapter. The search results are displayed in the search results area.
3. Click on the trade item. The Edit Item page is displayed.

4. Click Submit for Approval. The notification “New Item Approval Pending” is sent to the appropriate user to approve the newly created trade item.
If you have the permission to enrich the global attributes (the Global Enrichment option is turned off), no notification is sent to any user(s) for enriching the global attributes. Instead the page that allows you to complete enriching the global attributes is displayed.
For information about entering the values in the various fields, refer Enrich Global Attributes section.
Once you finish enriching the attributes, click Complete Global Enrichment. The page that allows you to submit the trade item for variant creation is displayed and the process is the same as explained in the previous sections.
If the variants for a trade item do not have to be enriched by different users, the Variant Attribute Enrichment option is turned off. In this case, once the variant is created and you click Save Variant, the page that allows you to enrich the variant attributes is displayed.
Enter the values in the different fields under the different variant tabs. Once you finish enriching the attributes, click Complete Local Enrichment. The page that allows you to submit the trade item for compliance check is displayed.
If the approval process is turned off for a trade item, then when you submit it for approval, it is approved automatically within the IBM Global Data Synchronization for WebSphere Product Center application.
You can create a list of approvers for various item category+ target market+ information provider combinations. For more information, refer the IBM Global Data Synchronization for WebSphere Product Center application Installation and Configuration Guide.
A trade item that is not yet added to the data pool can be edited. You can search for the trade item and edit the global attributes and variant attributes for that trade item. Once edited, the changes have to be approved by the appropriate user(s) before they are committed.
To edit a trade item:
1. In the Home page, click on the Manage Items tab. The Manage Items tab view is displayed. Click on the edit items link. The Edit Item page is displayed.
2. Search for the trade item that you want to edit. The search results are displayed in the search results area. For more information on performing a search, refer to the Explore section in this chapter
3. In the search results area, click on the displayed GTIN. The details of that trade item are displayed.
4. Type in values for the fields that you want to edit. Once you complete making the changes, submit the trade item for compliance check and then for approval. The notification message “New Item Approval Pending” is sent to the appropriate user(s) to approve the changes.
To approve a trade item:
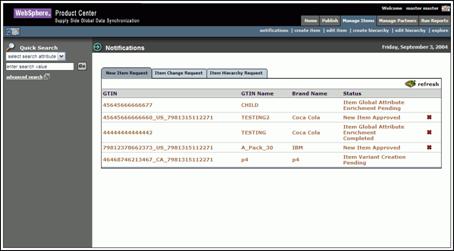
1. In the New Item Request tab view, click on the notification with status as “New Item Approval Pending” received for that particular GTIN. The details of the trade item are displayed.
![]()
New item request tab
Approve new Item screen
2. To approve a trade item, click Approve. The notification message “New Item Approved’ is sent to the appropriate user(s).
3. To reject the trade item, click Reject. The notification message “New Item Creation Rejected” is sent to the appropriate user(s).
The notifications are displayed in the New Item Request tab view.
Note: If all the users are required to approve the trade item, then only after all the users have clicked Approve, the notification is sent. If any one of the users is required to approve the trade item, then once any one of the users clicks Approve, the notification is sent. This is similar for trade item rejection also.
A trade item that has already been added to the data pool can be modified. You can modify the global attributes and variant attributes of the trade item. The changes have to be approved by the appropriate user(s) before they are committed. Once approved, the changes can be posted to the data pool.
To modify a trade item:
1. In the Manage Items tab view, click on the edit item link. The Search Item page is displayed.
2. Search for the trade item that you want to modify. For more information on performing the search, refer Search Trade Items section in the Explore section in this chapter. The search results are displayed in the search results area.
3. Click on the trade item that you want to modify. The details of the trade item are displayed.
4. Update the information for the various fields, submit the trade item for compliance check and then for approval. The notification message “Modify Item Approval Pending” is sent to the appropriate user(s) to approve the modifications.
To approve a modified trade item:
1. In the Manage Item-> Notification tab view, go to Item Change Request tab view.

Item Change Request tab
2. Click on the notification “Modify Item Approval Pending”. The details of the notification are displayed.

3. To approve a trade item, click Approve. The notification message “Modify Item Approved” is sent to the appropriate user(s).
To reject the trade item, click Reject. The notification message “Modify Item Rejected” is sent to the appropriate user(s).
The notifications are displayed in the Item Change Request tab view.
Once the trade item has been approved, synchronize the changes with the data pool. For information about synchronizing items, refer Synchronize Changes section in Chapter – 4 Manage Publications.
Note: If all the users are required to approve the trade item, then only after all the users have clicked Approve, the notification is sent. If any one of the users is required to approve the item, then once any one of the users clicks Approve, the notification is sent. This is similar for trade item rejection also.
An approved trade item can be deleted from the solution, but it is removed from the solution only after a purge program is run by the system administrator. If the trade item is linked to other trade item(s), those links need to be deleted first.
Deletions should be approved by the appropriate user(s) before they are committed.
To delete a trade item, search for the item and click Delete GTIN. The notification message “Item Deletion Approval Pending” is sent to the appropriate user(s) to approve the deletion of the trade item.
Purge scripts are written to physically delete trade items from the system based on the trade item status.
Pre-condition:
The system should have global item(s) with ‘DELETED’ status.
1. If the current global item (trade item without a variant) status is ‘DRAFT’, the trade Item can be physically deleted through GDS UI.
2. If the global Item status is ‘REGISTERED’, and the user attempts to delete the global item from GDS UI, it goes through the deletion approval process. Eventually, the global item status becoming ‘DELETED’. This means the global item is logically deleted from the system. In order to physically delete any global items that are in ‘DELETED’ status, purge script needs to be used.
Running the purge script:
1. The purge script is located at $GDS_INSTALL_DIR/src/db/schema/gds/purge_scripts/purge.sh.
2. Go to this directory.
3. Its run by specifying the following command line parameters – COMPANY_CODE, SCRIPT_PATH and USER_NAME
o COMPANY_CODE – the target company on which the trade items need to be purged.
o SCRIPT_PATH – denotes the path of the script that corresponds to the deletion type (global item/ variant/ trading partner/ subscription).
In this case SCRIPT_PATH is
$GDS_INSTALL_DIR/src/db/schema/gds/purge_scripts/globalItemPurgeScript
o USER_NAME – The Admin user mentioned in the gds.properties file.
4. Run Command:
purge.sh --script_path=<path/to/trigo/script> --company_code=<code> --user_name=<username>
Post-Condition:
All the global items with status ‘DELETED’ are purged from the system.
1. If the current local item status is ‘DRAFT’ or ‘COMPLETE’, the variant can be physically deleted through GDS UI.
2. If the local Item status is ‘APPROVED’ or ‘REGISTERED’, and the user attempts to delete it from GDS UI, it goes through the deletion approval process. Eventually, the local item status becomes ‘DELETED LOCALLY’. This means the local item is logically deleted from the system. In order to physically delete any local items that are in ‘DELETED LOCALLY’ status, purge script needs to be used.
1. The purge script is located at $GDS_INSTALL_DIR/src/db/schema/gds/purge_scripts/purge.sh.
2. Its run by specifying the following command line parameters – COMPANY_CODE, SCRIPT_PATH and USER_NAME
o COMPANY_CODE – the target company on which the trade items need to be purged.
o SCRIPT_PATH – denotes the path of the script that corresponds to the deletion type (global item/ variant/ trading partner/ subscription).
In this case SCRIPT_PATH is: $GDS_INSTALL_DIR/src/db/schema/gds/purge_scripts/globalLocalItemPurgeScript.
o USER_NAME – The Admin user mentioned in the gds.properties file
3. .Run Command:
purge.sh --script_path=<path/to/trigo/script> --company_code=<code> --user_name=<username>
Post-Condition:
All the local items with status ‘DELETED LOCALLY’ are purged from the system.
To approve the deleted trade item:
1. In the Manage Item-> Notification tab view, go to Item Change Request tab view, click on the notification message “Item Deletion Approval Pending”. The details of the notification are displayed.

Item Delete - Approve
2. Click Approve. The notification message “Item Deletion Approved” is sent to the appropriate user(s).
To reject the deletion of the trade item, click Reject. The notification message “Item Deletion Rejected” is sent to the appropriate user(s).
These notifications are displayed in the Item Change Request tab view.
Note: If all the users are required to approve the trade item, then only after all the users have clicked Approve, the notification is sent. If any one of the users is required to approve the trade item, then once any one of the users clicks Approve, the notification is sent. This is similar for trade item rejection also.
You can create trade item hierarchies in the IBM Global Data Synchronization for WebSphere Product Center application to perform data synchronization.
Once the trade item(s) have been created in the system, you can create links between them to create trade item hierarchies. This is a unique relationship from the highest level trade item with no parent to the lowest level trade item with no children.
Ensure that the created trade items in the hierarchy are in the right order (that is, a pallet is the parent of a case and not vice versa). After the trade item links are created, it has to be approved by the appropriate user.
There are two ways of creating hierarchies:
· When Creating a New Trade Item
· Using the Create Hierarchy Link
You can create trade item links when enriching global attributes or variant attributes for a trade item.
To create trade item links:
1. Click on the Item Links tab. The Item Links tab view is displayed.

Item Links Tab View
2. To add a parent trade item, click add. The Search page is displayed. Search for the GTIN that you want to add as a parent and click Next.
3. To add children to the parent trade item, click add and repeat the procedure in step 2. For more information on search, refer to the Explore section in this chapter.
4. Click Done. The links are saved.
To create a trade item hierarchy:
1. In the Home page, click on the Manage Items tab. The Manage Items tab view is displayed.
Manage Items Tab View
2. Click on the create hierarchy link. The Search page is displayed.
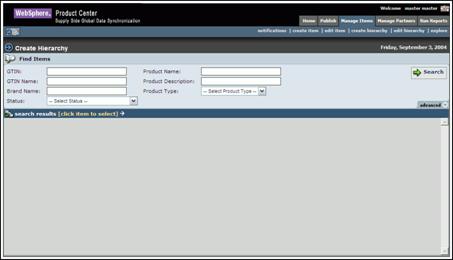
Create Hierarchy - Search
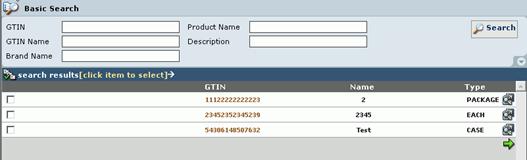
3. Search for the trade item for which you want to create links. For information about performing a search, refer to the Explore section in this chapter. The search results are displayed in the search results area.

Create Hierarchy – Search Results
4. Click on the trade item. The selected trade item is displayed.

Create Hierarchy
5. Select the GTIN and click Add Child to add a child to the selected GTIN. The Search page is displayed. Type in the search parameters and click Search. The search results display only those trade items that can be children of the selected trade item are displayed in the search results area.

Add Child – Search Results
6. Select the GTIN(s) that you want to add as the child, and click Next. The Add Links page displays the selected GTIN(s).
7. Type the quantity for the GTIN(s) in the text box and click Save. The selected GTIN(s) and the quantity are displayed in the Items Links For page.

Create Hierarchy – With Links
If you want to add more trade items as links, repeat the steps 6, 7, and 8.
To delete any link, select the GTIN and click Delete Child Link. For more information about deleting trade item links, refer the section Delete Trade Item Links.
8. Click Submit For Approval. The notification message “Item Link Approval Pending” is sent to the appropriate user (s) to approve the hierarchy. The notification is displayed in the Item Hierarchy Request tab view in the Manage Items page.
Note: Approval can be turned on or off through the configuration of the IBM Global Data Synchronization for WebSphere Product Center application.
A trade item link that is not yet added to the data pool can be modified. You can modify the parent trade item’s link. Once modified, the changes have to be approved by the appropriate user(s) before they are committed.
To modify a trade item hierarchy:
1. In the Home page, click on the Manage Items tab. The Manage Items tab view is displayed.
Manage Items Tab View
2. Click on the edit hierarchy link. The Search page is displayed.
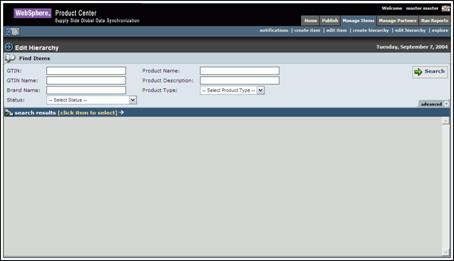
Edit Hierarchy - Search
3. Type the search parameters in the fields and click Search. The search results are displayed in the search results area. For more information on performing a search, refer to the Explore section in this chapter.

Edit Hierarchy – Search Results
4. Click on the GTIN for which you want to edit the hierarchy and click Next. The Item Links For page is displayed.

Edit Hierarchy
5. Click on the displayed GTIN. The links for the selected GTIN is displayed.

Edit Hierarchy – Item Links
6. Select the GTIN and click Add Child to add a child to the selected GTIN. The Search page is displayed. Type in the search parameters and click Search. The search results are displayed in the search results area. Only those GTINs that can be children of the parent GTIN are displayed.
Add Child – Search Results
7. Select the GTIN(s) that you want to add as the child, and click Next. The Add Links page displays the selected GTIN(s).

Edit Hierarchy - Add Links
8. Type the quantity for the GTIN(s) in the text box and click Save. The selected GTIN(s) and the quantity are displayed in the Items Links For page.

Edit Hierarchy – New Link
9.
To delete any link, select the GTIN and click ![]() . For more
information about deleting trade item links, refer the section Delete
Hierarchy Links.
. For more
information about deleting trade item links, refer the section Delete
Hierarchy Links.
10.
Click ![]() . The notification message
“Item Link Approval Pending” is sent to the appropriate user to approve the
hierarchy. The notification is displayed in the Item Hierarchy Request
tab view in the Manage Items page.
. The notification message
“Item Link Approval Pending” is sent to the appropriate user to approve the
hierarchy. The notification is displayed in the Item Hierarchy Request
tab view in the Manage Items page.
Note: Approval can be turned on or off through the configuration of the IBM Global Data Synchronization for WebSphere Product Center application.
To approve the created hierarchy:
1. In the Item Hierarchy Request tab view, click on the notification “Item Link Approval Pending”. The details of the notification are displayed.

Item Link - Approve
2. Click Approve. The notification message “Item Link Approved” is sent to the appropriate user(s).
To reject the hierarchy, click Reject. The notification message “Item Link Rejected” is sent to the appropriate user (s).
These notifications are displayed in the Item Hierarchy Request tab view.
A trade item link that is added to the data pool, but not yet published to any demand-side trading partners, can be deleted. Deletions should be approved by the appropriate user before they are committed. You cannot delete trade item links that have already been published to demand-side trading partners.
To delete a trade item link:
1. In the Home page, click on the Manage Items tab. The Manage Items tab view is displayed.
Manage Items Tab View
2. Click on the edit hierarchy link. The Search page is displayed.
Edit Hierarchy - Search
3. Type the search parameters in the fields and click Search. The search results are displayed in the search results area. For more information on performing a search, refer to the Explore section in this chapter.
Edit Hierarchy - Search Results
4.
Click on the GTIN for which you want to delete a trade item link
and click ![]() . The Item Links For
page is displayed.
. The Item Links For
page is displayed.
5. Click on the displayed GTIN. The links for the selected GTIN is displayed.

Edit Hierarchy – Item Links
6.
Select the parent link for which you want to delete the child
links and click![]() . The Delete Child Links window
displays the links that you have selected.
. The Delete Child Links window
displays the links that you have selected.
7. Select the link(s) that you want to delete and click Delete Links. The notification message “Item Link Approval Pending” is sent to the appropriate user. This notification is displayed in the Item Hierarchy Request tab view.
To approve the deleted trade item:
1. In the Item Hierarchy Request tab view, click on the notification “Item Link Approval Pending”. The details of the notification are displayed. The link that is deleted is highlighted in red.

Item Link Approval
2. Click Approve. The notification message “Item Link Approved” is sent to the appropriate user(s).
To reject, click Reject. The notification message “Item Link Rejected” is sent to the appropriate user (s).
These notifications are displayed in the Item Hierarchy Request tab view.
The IBM Global Data Synchronization for WebSphere Product Center application offers three search options:
· Quick Search - The Quick Search option is displayed in the left navigation pane on all the main pages. You can search by object or by attributes.
· Basic Search – The Basic Search option is displayed by default when you access a search page. This allows you to search for information related to the section you are currently working on. For example, Manage Trade items section.
· Advanced Search – The Advanced Search option allows you to perform a more detailed search.
You can perform the following:
· Browse Hierarchy transactions
· Search Trade Item Transactions
· Search Hierarchy Transactions
To search for trade items:
1. In the Manage Items tab view, click on the explore link. The Explore Item page is displayed.

Search Items – Basic Search
2. You can type search parameters in any or all the following fields:
a. In the GTIN field, type the GTIN for the trade item.
b. In the Product Name field, type the name of the product.
c. In the GTIN Name field, type the name of the GTIN.
d. In the Product Description field, type the description for the GTIN.
e. In the Brand Name field, type the name of the brand.
f. From the Product Type drop-down menu, select the type of the product. Options available are Case, Display/ Shipper, Each, Mod Pallet (Mixed), Package, Pallet.
g. From the Status drop-down menu, select the status of the trade item.
3. For a more detailed search, click advanced. Additional fields where you can type in search parameters are displayed.

Search Items - Advanced
a. In the Information Provider [GLN] field, type the global location number of the information provider.
b. In the Target Market field, click add TM and select a target market.
c. In the Information Provider [Name] field, type the name of the information provider.
d. In the UDEX Category Code field, type the UDEX Category code.
e. In the Owning Organization Name field, type the name of the brand owner.
f. In the UDEX Category Description field, type the description of UDEX Category.
g. In the Manufacturer [GLN] field, type the global location number of the manufacturer.
h. In the Manufacturer [Name] field, type the name of the manufacturer.
i. From the options for Ordering Unit Indicator, select Yes, No or None.
4. Click Search. The search results are displayed in the search results area.
You can browse for an item through the classification system.
To for an item:
1. Go to Manage Item>Explore link. Click on the Browse Item tab. The Brows eItem page is displayed.

The classification tree view is displayed on the left of the screen. When you click on the Item Name, the details of the item are displayed on the right of the screen
To search for hierarchy transactions:
1. Go to Manage Item>Explore. The Explore Item page is displayed. Click on the Browse Hierarchy Tab. The Browse Hierarchy view is displayed.

Search Item Transaction
2. You can type search parameters in any or all the following fields:
a. In the GTIN field, type the GTIN for the trade item.
b. In the Product Name field, type the name of the product.
c. In the GTIN Name field, type the name of the GTIN.
d. In the Product Description field, type the description for the GTIN.
e. In the Brand Name field, type the name of the brand.
f. From the Product Type drop-down menu, select the type of the product. Options available are Case, Display/ Shipper, Each, Mod Pallet (Mixed), Package, Pallet.
g. From the Status drop-down menu, select the status of the trade item.
3. Click Search. The search results are displayed in the search results area.
Note: Unlike the general search, this search will display only those Items that are a part of hierarchy
You can search for new, edited, or modified trade items that are approved, status of the trade items that are sent for global/variant attribute enrichment.
To search for trade item transactions:
1. Go to Manage Items>Explore. Click on the Item Transaction tab. The Item Transaction tab view is displayed.
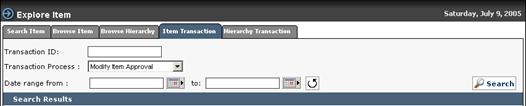
Search Item
2. You can type search parameters in any or all the following fields:
a. In the Transaction ID field, type the ID of the transaction that you want to search for.
b. From the Transaction Type drop-down menu, select the type of transaction
c.
In the Date range from and to fields, select the dates
using the Calendar icon![]() . If you want to clear the date
range fields, click Clear Date.
. If you want to clear the date
range fields, click Clear Date.
3. Click Search. The search results are displayed in the search results area.
4. Click on any of the transaction to view the details. The Transaction Detail page is displayed.
You can search for new or modified links that are approved.
To search for hierarchy transactions:
1. Go to Manage Items>explore. Click on the Hierarchy Transaction tab. The Hierarchy Transaction tab view is displayed.

Search Hierarchy Transaction
2. You can type search parameters in any or all the following fields:
a. In the Transaction ID field, type the ID of the transaction that you want to search for.
b. From the Transaction Type drop-down menu, select the type of transaction.
c.
In the Date range from and to fields, select the dates
using the Calendar icon![]() . If you want to clear the date
range fields, click Clear Date.
. If you want to clear the date
range fields, click Clear Date.
3. Click Search. The search results are displayed in the search results area.
Ch 6 Managing Trading Partners
A trading partner is an organization or an individual with whom information or data is accessed or exchanged in the supplier chain, such as a manufacturer (seller), retailer (buyer), or distributor.
This chapter describes the various tasks related to managing trading partners within the IBM Global Data Synchronization for WebSphere Product Center application.
Topics:
You can create and modify a trading partner from the Home page. The tasks are displayed in Quick Tasks on the left navigation pane.
You can view all notifications related to trading partner requests in the Notifications page. This page contains the following tabs:
· New Trading Partner Request
· Trading Partner Change Request
To view the list of notifications for each, click on the corresponding tab. The New Trading Partner Request tab view is displayed by default.

Manage Partners - Notifications
Each notification is represented by a GTIN. To view the details of a notification, click on the notification. The Notification Details page is displayed.
Notifications that are for information only can be
viewed and dismissed. To remove the notification from the list, click on the
Dismiss ![]() icon.
icon.
The types of notifications that you can receive for new trading partner requests are:
· New Trading Partner Approval Pending
· New Trading Partner Approved
· New Trading Partner Rejected
The types of notifications that you can receive for trading partner change requests are:
· Modified Trading Partner Approval Pending
· Modified Trading Partner Approved
· Modified Trading Partner Rejected
· Trading Partner Deletion Approval Pending
· Trading Partner Deletion Approved
· Trading Partner Deletion Rejected
You can create a record of a trading partner in the system where the data synchronization is performed. You can specify the following information in the record:
· Trading Partner Identification (GLN) - The trade location of the trading partner.
· Trading Partner Role – A role can be that of a retailer, distributor, or manufacturer.
· Trading Partner Name and Address – The name and store address of the trading partner.
· Effective Dates – The Start and End date
· Time zone.- Time zone of the trading partner
To create a trading partner:
1. Go to Manage Partners>Create Trading Partners tab. The Create New Trading Partner page is displayed.

Create New Trading Partner
2. Type the trading partner information in the listed fields:
a. In the GLN field, type the global location number. This is the unique 13-digit number used to identify a trade location.
b. From the Role drop-down menu, select the role of the trading partner.
c. In the Name field, type the name of the organization.
d. In the Address fields, fill in the location details of the trading partner.
e. In the City and State/Province fields, type the names of the city and the state to which the trading partner belongs.
f.
In the Country field, click on the Look Up icon ![]() and
select the country to which the trading partner belongs.
and
select the country to which the trading partner belongs.
g. In the Postal Code field type the postal code.
h.
In the Effective Start Date field, click on the Calendar
icon![]() to select the start date.
to select the start date.
i.
In the Effective End Date field, click on the Calendar
icon![]() to select the end date.
to select the end date.
j. From the Is Active drop-down menu, select Yes or No to specify whether the trading partner is active or not.
k. From the Time Zone drop-down menu, select the time zone relevant to the trading partner.
l. From the Language drop-down menu, select the language of the trading partner.
3.
Click![]() . The trading partner is
created and the Contacts table is displayed on the same page.
. The trading partner is
created and the Contacts table is displayed on the same page.
4.
To add contact details, click![]() . Text entry fields
where you can add contact information are displayed.
. Text entry fields
where you can add contact information are displayed.

Create New Trading Partner – Manage Contacts
5. Type contact details in the listed fields:
a. In the Name field, type the name.
b. In the Telephone field, type the telephone number.
c. In the E-mail field, type the email address.
d. From the Role drop-down menu, select the role of the contact person for that trading partner.
6. Click Save. The contact details are displayed in the Contacts area.
To add details of another contact, repeat steps 6 and 7.
To edit a contact, click on the Edit icon![]() .
.
To delete the contact information, click on the Delete
icon![]() .
The contact information for that contact is removed from the Contacts area.
.
The contact information for that contact is removed from the Contacts area.
7. When you finish adding contacts, click Partner Details. The Create New Trading Partner page is displayed again. The contacts that you have added are displayed in the Contacts area.
8.
After filling in the details for the trading partner, click ![]() .
The notification “New Trading Partner Approval Pending” is sent to the
appropriate user for approval. The notification is displayed in the New
Trading Partner Request tab view in the Manage Partners page.
.
The notification “New Trading Partner Approval Pending” is sent to the
appropriate user for approval. The notification is displayed in the New
Trading Partner Request tab view in the Manage Partners page.
9.
If you have not finished adding the information, and you want to
save a draft version, click![]() .
.
10.
To delete the trading partner, click![]() . The trading partner
is deleted.
. The trading partner
is deleted.
When a new trading partner is sent for approval, the notification for approving the new trading partner is displayed in the New Trading Partner Request tab view.
To approve a new trading partner:
1. In the New Trading Partner Request tab view, click on the notification “New Trading Partner Approval Pending”. The details of the notification are displayed.
2. To approve the trading partner, click Approve. The notification message “New Trading Partner Approved’ is sent to the appropriate user(s).
To reject the trading partner, click Reject. The notification message “New Trading Partner Rejected” is sent to the appropriate user(s).
The notifications are displayed in the New Trading Partner Request tab view.
Note: If all the users are required to approve the trading partner, then only after all the users have clicked Approve, the notification is sent. If any one of the users is required to approve the trading partner, then once any one of the users clicks Approve, the notification is sent. This is similar for trading partner rejection also.
You can modify those trading partners that are not sent for approval.
To modify the information on a trading partner:
1. Go to Manage Partner>Edit Trading Partners. The Edit Trading Partner page is displayed.

Edit Trading Partner - Search
2. Search for the GLN that you want to modify. For more information on performing a search, refer to the Explore section in this chapter.
3. In the search results area, click on the GLN that you want to modify. The details of that GLN (trading partner) are displayed.

Edit Trading Partner - Details
4. Edit the trading partner information in the listed fields:
a. In the GLN field, edit the global location number. This is the unique 13-digit number used to identify a trade location.
b. From the Role drop-down menu, select the role of the trading partner.
c. In the Name field, edit the name of the organization.
d. In the Address fields, fill in the location details of the trading partner.
e. In the City and State/Province fields, type the names of the city and the state to which the trading partner belongs.
f.
In the Country field, click on the Look Up icon ![]() and
select the country to which the trading partner belongs.
and
select the country to which the trading partner belongs.
g. In the Postal Code field type the postal code.
h.
In the Effective Start Date field, click on the Calendar
icon![]() to select the start date.
to select the start date.
i.
In the Effective End Date field, click on the Calendar
icon![]() to select the end date.
to select the end date.
j. From the Is Active drop-down menu, select Yes or No to specify whether the trading partner is active or not.
k. From the Time Zone drop-down menu, select the time zone relevant to the trading partner.
l. From the Language drop-down menu, select the language of the trading partner.
5.
To add or modify existing contacts, click ![]() .
.
6. To add a new contact:
a. In the Name field, type the name.
b. In the Telephone field, type the telephone number.
c. In the E-mail field, type the email address.
d. From the Role drop-down menu, select the role of the contact person for that trading partner.
7.
Click ![]() . The contact details are
displayed in the Contacts area.
. The contact details are
displayed in the Contacts area.
8.
To modify the existing contact details, click on the Edit
icon![]() for that contact. The contact details are displayed in the text fields. Update
the information, and click Save. The updated information for that
contact is displayed in the Contacts area.
for that contact. The contact details are displayed in the text fields. Update
the information, and click Save. The updated information for that
contact is displayed in the Contacts area.
9. When you finish adding contacts, click Partner Details. The Modify Trading Partner page is displayed again. The contacts that you have added or updated are displayed in the Contacts area.
10.
After filling in the details for the trading partner, click ![]() .
The notification message “Modified Trading Partner Pending Approval” is sent to
the appropriate user for approval. The notification is displayed in the Trading
Partner Change Requests tab view in the Manage Trading Partners
page.
.
The notification message “Modified Trading Partner Pending Approval” is sent to
the appropriate user for approval. The notification is displayed in the Trading
Partner Change Requests tab view in the Manage Trading Partners
page.
11.
If you have not finished adding the information, and you want to
save a draft version, click ![]() .
.
12.
To delete the trading partner, click ![]() . A notification is
sent to the appropriate user to confirm the deletion.
. A notification is
sent to the appropriate user to confirm the deletion.
When a modified trading partner is sent for approval, the notification for approving the trading partner is displayed in the Trading Partner Change Request tab view.
To approve a modified trading partner:
1. In the Trading Partner Change Request tab view, click on the notification “Modified Trading Partner Pending Approval”. The details of the notification are displayed.
2. To approve the trading partner, click Approve. The notification message “Modified Trading Partner Approved’ is sent to the appropriate user(s).
To reject the trading partner, click Reject. The notification message “Modified Trading Partner Rejected” is sent to the appropriate user(s).
The notifications are displayed in the Trading Partner Change Request tab view.
Note: If all the users are required to approve the trading partner, then only after all the users have clicked Approve, the notification is sent. If any one of the users is required to approve the trading partner, then once any one of the users clicks Approve, the notification is sent. This is similar for trading partner rejection also.
You can delete trading partners that are in the draft status or that has been approved. If a trading partner that is in approved status is deleted, the deletion has to be approved by the appropriate user(s).
To delete a trading partner that is in draft status, click Delete Partner. The trading partner record is deleted from the system. No notification is sent for approval.
To delete a trading partner that is in approved status, click Delete Partner. The notification “Trading Partner Deletion Pending Approval” is sent to the appropriate user. The notification is displayed in the Trading Partner Change Request tab view.
Note: To completely remove the trading partner from the system, purge scripts need to be run.
To approve a deleted trading partner:
1. In the Trading Partner Change Request tab view, click on the notification “Trading Partner Deletion Pending Approval”. The details of the notification are displayed.
2. To approve the trading partner, click Approve. The notification message “Trading Partner Deletion Approved’ is sent to the appropriate user(s).
To reject the trading partner, click Reject. The notification message “Trading Partner Deletion Rejected” is sent to the appropriate user(s).
The notifications are displayed in the Trading Partner Change Request tab view.
Purge scripts are written to physically delete trading partners from the system based on the status.
Pre-condition:
The system should have Trading Partner(s) with ‘DELETED’ status.
If the Trading Partner status is ‘APPROVED’, and the user attempts to delete the Trading Partner from GDS UI, it goes through the deletion approval process. Eventually, the Trading Partner status becomes ‘DELETED’. This means the Trading Partner is logically deleted from the system. In order to physically delete any Trading Partner(s) that are in ‘DELETED’ status, purge script needs to be used.
1. The purge script is located at $GDS_INSTALL_DIR/src/db/schema/gds/purge_scripts/purge.sh.
2. Run the script by specifying the following command line parameters – COMPANY_CODE, SCRIPT_PATH and USER_NAME
o COMPANY_CODE – the target company on which the trade items need to be purged.
o SCRIPT_PATH – denotes the path of the script that corresponds to the deletion type (trading partner).
In this case SCRIPT_PATH is
$GDS_INSTALL_DIR/src/db/schema/gds/purge_scripts/tradingPartnerPurgeScript.
o USER_NAME – The Admin user mentioned in the gds.properties file
3. Run Command:
purge.sh --script_path=<path/to/trigo/script> --company_code=<code> --user_name=<username>
Post-Condition:
All the Trading Partner(s) with status ‘DELETED’ are purged from the system.
The IBM Global Data Synchronization for WebSphere Product Center application offers three search options:
· Quick Search - The Quick Search option is displayed in the left navigation pane on all the main pages. You can search by object or by attributes.
· Basic Search – The Basic Search option is displayed by default when you access a search page. This allows you to search for information related to the section you are currently working on. For example, Manage Trade items section.
· Advanced Search – The Advanced Search option allows you to perform a more detailed search.
You can perform the following:
· Search Trading Partner Transactions
To search for trading partners:
1. Go to Manage Partner>Explore. The Search Trading Partner tab view is displayed.

Explore Trading Partner- Basic Search
2. You can type search parameters in any or all the following fields:
a. In the GLN field, type the GLN of the trading partner.
b. In the Partner Name field, type the name of the trading partner.
c. From the Status drop-down menu, select the status of the trading partner.
d. For a more detailed search, click advanced. Additional fields where you can type in search parameters are displayed.

Explore Trading Partner – Advanced Search
e. In the Contact field, type the contact number of the trading partner.
f. From the Party Role drop-down menu, select the role of the trading partner. Options available are Exchange, Manufacturer, Retailer, Supplier.
g. In the City [Name] field, type the name of the city to which the trading partner belongs to.
h.
In the Country Code field, click on the Look Up![]() icon
and select the country to which the trading partner belongs to.
icon
and select the country to which the trading partner belongs to.
i. From the Language drop-down menu, select the language of the trading partner.
3. Click Search. The search results are displayed in the search results area.
4. Click on the GLN for which you want to view the details. The Trading Partner Detail page is displayed.
You can search for new or modified trading partner information that is approved.
To search for transactions related to trading partners:
1. Go to Manage Partner>Explore. Click on the Search Transactions tab. The Search Transactions tab view is displayed.
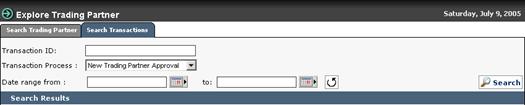
Explore Trading Partner - Search Transactions
2. You can type search parameters in any or all the following fields:
a. In the Transaction ID field, type the ID of the publication that you want to search for.
b. From the Transaction Type drop-down menu, select the type of transaction.
c.
In the Date range from and to fields, select the dates
using the Calendar icon![]() . If you want to clear the date
range fields, click Clear Date.
. If you want to clear the date
range fields, click Clear Date.
3. Click Search. The search results are displayed in the Details area.
4. Click on the transaction for which you want to view the details. The Transaction Detail page is displayed.
The IBM Global Data Synchronization for WebSphere Product Center application provides pre-defined report templates to facilitate business reporting. You can use these report templates to complete data synchronization tasks, perform business process analysis, and generate management-level summary reports.
Topics:
You can generate the following reports:
· List of Registered Items – This report provides you the list of trade items that have been registered with the data pool.
· Time Taken to Enrich Variants – This report provides the average time taken for the supply-side trading partner to enrich trade item variants.
· Time Taken to Approve an Item – This report provides the average time taken for the supply-side trading partner to approve a trade item that is ready for registration.
· Time Taken to Approve Item Change – This report provides you the average time taken for the supply-side trading partner to approve a trade item information change.
· Time Taken to Enrich Global Attribute – This report provides the average time taken for the supply-side trading partner to enrich global trade item attributes.
· List of items registered with Global Registry
· List of items failed registration with Global Registry
· List of items pending registration with Global Registry
· List of Accepted/Rejected Publications - This report provides you the list of trade items that were accepted or rejected by the trading partner.
· List of Publications Pending Authorization- This report provides you the list of trade item publications that are waiting for authorization.
· Time Taken to Accept a Publication - This report provides you the average time taken for a trading partner to accept an initial load publication, a new trade item publication or a trade item modification/correction.
· Total Number of Publications – This report provides the number of trade items that have been sent as initial load or new publications to a trading partner.
· Time Taken to Approve Trading Partner change – This report provides you the average time taken for the supply-side trading partner to approve a trading partner information change.
· User Activity – This report provides the activities of a user over a period of time.
Each report has a fixed set of parameters for which you can enter values.
To run a report:
1. In the Home page, click on the Run Reports tab. The Reports Console page displays the list of reports that can be generated.

Run Reports Tab View
2. Click on the type of report that you want to generate. For example, if you click on the User Activity link, the Run Reports page is displayed.

Reports
3. In the listed fields, type in the values for the parameters.
4. Click Run Report. The Results page displays the report based on the values specified.

Results
|
List of Registered Items |
|
|
Field |
Description |
|
From Date / To Date |
Allows you to select the date between which the report is to be generated. |
|
Internal Item Category |
Allows you to search and select an internal item category. |
|
Target Market |
Allows you to select the target market. |
|
Information Provider |
Allows you to select the information provider. |
|
Data Pool |
Allows you to select the data pool to which the trade item has been registered. |
|
Time Taken to Enrich Variants |
|
|
Field |
Description |
|
From Date / To Date |
Allows you to select the date between which the report is to be generated. |
|
Internal Item Category |
Allows you to search and select an internal item category. |
|
Target Market |
Allows you to select the target market. |
|
Information Provider |
Allows you to select the information provider. |
|
Report by |
Allows you to generate the report by Date, Week, Month or Internal Item Category. |
|
Time Taken to Approve an Item |
|
|
Field |
Description |
|
From Date / To Date |
Allows you to select the date between which the report is to be generated. |
|
Internal Item Category |
Allows you to search and select an internal item category. |
|
Target Market |
Allows you to select the target market. |
|
Information Provider |
Allows you to select the information provider. |
|
Report by |
Allows you to generate the report by Date, Week, Month or Internal Item Category. |
|
Time Taken to Approve Item Change |
|
|
Field |
Description |
|
From Date / To Date |
Allows you to specify the dates between which the report is to be generated. |
|
Internal Item Category |
Allows you to search and select an internal item category. |
|
Target Market |
Allows you to select the target market. |
|
Information Provider |
Allows you to select the information provider. |
|
Report by |
Allows you to generate the report by Date, Week, or Month. |
|
Time Taken to Enrich Global Attribute |
|
|
Field |
Description |
|
From Date / To Date |
Allows you to select the date between which the report is to be generated. |
|
Internal Item Category |
Allows you to select the internal item category. This is a mandatory field. |
|
Report by |
Allows you to generate the report based on Day, Week, Month, or Internal Item category. |
|
List of Items Registered With Global Registry |
|
|
Field |
Description |
|
From Date / To Date |
Allows you to select the date between which the report is to be generated. |
|
Internal Item Category |
Allows you to select the internal item category. This is a mandatory field. |
|
Target Market |
Allows you to select Target Market |
|
Information Provider |
Allows you to select the Information Provider |
|
Data Pool |
Allows you to select the data pool to which the trade item has been registered. |
|
List of Items Failed Registration With Global Registry |
|
|
Field |
Description |
|
From Date / To Date |
Allows you to select the date between which the report is to be generated. |
|
Internal Item Category |
Allows you to select the internal item category. This is a mandatory field. |
|
Target Market |
Allows you to select Target Market |
|
Information Provider |
Allows you to select the Information Provider |
|
Data Pool |
Allows you to select the data pool to which the trade item has been registered. |
|
List of Items Pending Registration With Global Registry |
|
|
Field |
Description |
|
From Date / To Date |
Allows you to select the date between which the report is to be generated. |
|
Internal Item Category |
Allows you to select the internal item category. This is a mandatory field. |
|
Target Market |
Allows you to select Target Market |
|
Information Provider |
Allows you to select the Information Provider |
|
Data Pool |
Allows you to select the data pool to which the trade item has been registered. |
|
List of Accepted/Rejected Publications |
|
|
Field |
Description |
|
From Date / To Date |
Allows you to select the date between which the report is to be generated. |
|
Internal Item Category |
Allows you to search and select an internal item category. |
|
Trading Partner |
Allows you to search and select the trading partner to whom you have published the trade item. |
|
Target Market |
Allows you to select the target market. |
|
Information Provider |
Allows you to select the information provider. |
|
Publication Type |
Allows you to select the type of publication. |
|
Publication Status |
Allows you to select the status of the publication. |
|
List of Publications Pending Authorization |
|
|
Field |
Description |
|
Item Age |
Allows you to select the age of the trade item. That is, upto one week, one-to-two weeks and so on. |
|
Trading Partner |
Allows you to search and select the trading partner to whom you have published the trade item. |
|
Internal Item Category |
Allows you to select the internal item category. This is a mandatory field. |
|
Target Market |
Allows you to select the target market. |
|
Information Provider |
Allows you to select the information provider. |
|
Publication Type |
Allows you to generate the report based on New Item, Initial Load, and Synchronize. |
|
Time Taken to Accept a Publication |
|
|
Field |
Description |
|
From Date / To Date |
Allows you to select the date between which the report is to be generated. |
|
Internal Item Category |
Allows you to select the internal item category. This is a mandatory field. |
|
Trading Partner |
Allows you to search and select the trading partner to whom you have published the trade item. |
|
Target Market |
Allows you to select the target market. |
|
Information Provider |
Allows you to select the information provider. |
|
Report by |
Allows you to generate the report based on Day, Week, Month, Internal Item category, and Trading Partner. |
|
Publication Type |
Allows you to select the type of publication. Options available are New Item, Initial Load, and Synchronize. |
Total Number of Publications |
|
|
Field |
Description |
|
From Date / To Date |
Allows you to select the date between which the report is to be generated. |
|
Internal Item Category |
Allows you to select the internal item category. This is a mandatory field. |
|
Target Market |
Allows you to search and select the trading partner to whom you have published the trade item. |
|
Information Provider |
Allows you to select the information provider. |
|
Report by |
Allows you to generate the report based on Day, Week, Month, and Internal Item category. |
|
Publication Type |
Allows you to select the type of publication. Options available are New Item, Initial Load, and Synchronize. |
|
Trading Partner |
Allows you to select the trading partner to whom the trade item is published as an initial load or a new trade item. |
|
Data Pool |
Allows you to select the data pool. |
|
Time Taken to Approve Trading Partner Changes |
|
|
Field |
Description |
|
From Date / To Date |
Allows you to specify the dates between which the report is to be generated. |
|
Report by |
Allows you to generate the report by Date, Week, or Month. |
|
User Activity |
|
|
Field |
Description |
|
From Date / To Date |
Allows you to specify the dates between which the report is to be generated. |
|
User Activity |
Allows you to select an action such as create trade item, modify trade item, and so on. |
|
User ID |
Allows you to select the user ID for which the report is to be generated. |
There are various roles that are preceded in the application. For more information, refer to section Appendix A – Sample Scenarios, supply side in the IBM Global Data Synchronization for WebSphere Product Center application Installation, Configuration, and Administration Guide. This appendix also provides the list of accessible features and operations that can be performed by the respective roles.
This appendix provides the list of statuses for a trade item when it is being globally enriched and locally enriched.
· Draft – The trade item is in the Draft state when it has only global information and no variant(s).
· Draft With Variant – The trade item is in Draft With Variant state when it has global information and the variant(s).
· Registered – The trade item is in the Registered state when the it has been registered with the data pool and it is in synchronization with the IBM Global Data Synchronization for WebSphere Product Center application data.
· Deleted – The trade item is in the Deleted state when the trade item deletion is approved.
· Deleted Locally – The trade item is in Deleted Locally state until you run the purge script.
· Global Enrichment Completed – The trade item is in Global Enrichment Completed state when all the users have completed enriching the global attributes for the trade item.
· Pending Variant Creation – The trade item is in Pending Variant Creation state when it is submitted for variant creation.
· Modified Locally - The trade item is in Modified Locally state when the global attributes have been modified.
Note: Registered-GS1-, Registered – GS1 non compliant: This is no longer a valid status but is an extended status that shows in the item transaction
· Draft - The trade item is in the Draft state when the local enrichment is not complete.
· Complete – The trade item is in “Complete” state after the enrichment is complete and it is ready for compliance check.
· Edited – The trade item is in “Edited” state when it is edited after the trade item has been approved.
· Approved – The trade item is in the “Approved” state when it has been approved by the appropriate user.
· Registered - The trade item is in the” Registered” state when it has been registered with the data pool.
· Rejected - The trade item is in “Rejected” state when it is rejected by the data pool for registration.
· Modified Locally - The trade item is in Modified Locally state when it has been modified and it is not in synchronization with the data pool.
· Modified - The trade item is in Modified state when it has been modified in the system after it is registered with 1Sync.
· Modified Compliant – The trade item, after modification and passing compliance check, is in modified compliant state.
· Modified Compliant approval pending – After modified compliant state, when the user submits for approval, the status is Modified Compliant approval pending.
· Deleted Locally - The trade item is in Deleted Locally state when it exists in the data pool and until the deletion has been approved.
· Deleted - The trade item is in the Deleted state when the trade item deletion is approved.
· Submitted For Registration – – The trade item is in “Submitted For Registration” state when it is sent for registration with the data pool.
· Compliant – The trade item is in “Compliant” state when it is compliant with the data pool specifications.
This appendix provides the list of additional attributes that are mandatory when connecting to UCCNet through 1 Sync. Also it provides the list of non-changeable attributes once the trade item is added to 1 Sync.
The mandatory attributes when connecting with UCCNet through 1 Sync are:
· Owning Organization
· Consumer Unit Indicator
· Base Unit Indicator
· Variable Weight Trade Item
· Product Name
· Product Description
· Dispatch Unit Indicator
· Invoice Unit Indicator
· Packaging Marked Recyclable
· Packaging Marked Returnable
The attributes that are not changeable once the trade item has been added to 1 Sync are:
· Global Trade Item Number (GTIN)
· GTIN Name
· Product Type
· Brand Description
· Pack
· Size Metric
· Size Imperial
· Global Item Classification Code (UDEX Category)
· EAN/UCC Type
This appendix provides a list for all errors potentially encountered when sending Global Data Synchronization Messages.
Topics
· Error and Confirmation Messages Generated by 1 Sync
The following table provides the list of error and confirmation messages generated by IBM Global Data Synchronization for WebSphere Product Center application. Errors can include missing fields required by the application, incorrect values, and so on.
|
Error Message |
Description |
|
This notification is no longer valid. |
This message is generated when the solution looks for the particular notification that is not present in the system. |
|
Notification is not found for the given parameters |
This message is generated when the solution does not find the notification for the given parameters (for example, if the notification is already deleted due to some reason). |
|
Error processing this page. Please try again. |
This message is generated when the user clicks on any action and the system is not able to execute the same. |
|
Could not retrieve Reports List. |
This message is generated when the list of reports cannot be loaded. |
|
Could not generate Report Input Parameters. |
This message is generated when the screen that allows you to type in the input parameters is not displayed. |
|
Could not retrieve the Report Details. |
This message is generated when there is an error retrieving the report results. |
|
No input parameters defined for this Report. |
This message is generated when no input parameters or no entry is made for the report in reportdefinition.xml. |
|
Another Trading Partner exists with same GLN. |
This message is generated when the GLN trying to create which already exists in the system. |
|
Invalid GLN. |
This message is generated when the GLN checksum fails. |
|
Invalid Target Market. |
This message is generated for an invalid country code. |
|
Another Trade Item exists with same Global Trade Item Number. |
This message is generated when the new GTIN that is being created matches a GTIN that already exists in the solution. |
|
Invalid Product Type. |
This message is generated when the Product Type specified is not valid. |
|
Invalid Classification. |
This message is generated when the classification specified is not valid. |
|
Invalid Category.{0} |
This message is generated for an invalid category entry. |
|
Global Trade Item Number is invalid. |
This message is generated if the GTIN checksum is invalid. |
|
Invalid unit of measure for the specified value. |
This message is generated if the units are not specified for the UOM. |
|
This is a Required field if the Base Unit Indicator is true. |
Some fields are mandatory if the base unit indicator value in the global local catalog is true. This message is generated when those fields have not been filled in. |
|
This is a Required field if the Ordering Indicator is true. |
Some fields are mandatory if the ordering unit indicator value in the global local catalog is true. This message is generated when those fields have not been filled in. |
|
The Owning Organization has invalid Global Location Number. |
This message is generated if the given GLN is invalid. For example, it should atleast be 13 characters. |
|
Global Location Number is invalid. |
This message is generated if the entered GLN value is incorrect. |
|
It is recommended that you populate this attribute if "Product Type" is PL (Pallet). |
This message is generated when the product type is pallet and there is no value specified for this field. |
|
Do not populate if Product Type is PL (Pallet). |
This message is generated when the product type is pallet and one or all of the following fields have been populated. · Num of Items per Pallet · Non GTIN Pallet Height · Non GTIN Pallet Gross Weight |
|
This is required when Product Group ID Maintenance Agency attribute is populated. |
This message is generated when the Product Group ID Maintenance Agency attribute is populated and no value is specified for Product Group ID field. |
|
This is required when Alternate Item Number is populated. |
This message is generated when the Alternate Item Number attribute is populated and no value is specified for Alternate Item Identification Maintenance Agency field. |
|
This is required when Alternate Item Identification Maintenance Agency is populated. |
This message is generated when the Alternate Item Identification Maintenance Agency attribute is populated and no value is specified for Alternate Item Number field. |
|
The Unit of Measure for depth, height, width and diameter must be consistent for each Trade Item. |
This message is generated when the unit of measure for depth, height, width, and diameter is not consistent. |
|
The Unit of Measure for gross weight, packaging weight, net weight and drained weight must be consistent for each Trade Item. |
This message is generated when the unit of measure for gross weight, packaging weight, net weight, and drained weight is not consistent. |
|
The Unit of Measure for Peg Horizontal and Peg Vertical should be consistent for each Trade Item. |
This message is generated when the unit of measure for Peg Horizontal and Peg Vertical is not consistent. |
|
This is required if Tax Rate attribute is populated. |
This message is generated when the Tax Rate attribute is populated and no value is specified for Tax Type field. |
|
This is required if Tax Type attribute is populated. |
This message is generated when the Tax Type attribute is populated and no value is specified for Tax Rate field. |
|
The Unit of Measure for must be consistent with order quantity for each trade item. |
This message is generated when the unit of measure is not consistent with the order quantity for each trade item. |
|
This is required if Associated Item is populated. |
This message is generated when the Associated Item attribute is populated and no value is specified for Associated Qualifier field. |
|
This is required if Associated Qualifier is populated. |
This message is generated when the Associated Qualifier attribute is populated and no value is specified for Associated Item field. |
|
This is required if Approval/Certification attribute is populated. |
This message is generated when the Approval/Certification attribute is populated and no value is specified for Approval/Certification Maintenance Organization field. |
|
This is required if Approval/Certification Maintenance Organization attribute is populated. |
This message is generated when the Approval/Certification Maintenance Organization attribute is populated and no value is specified for Approval/Certification field. |
|
This is required if Hazard mat class Code attribute is populated. |
This message is generated when the Hazard mat class Code attribute is populated and no value is specified for Hazard Code field. |
|
This is required if Hazard Code attribute is populated. |
This message is generated when the Hazard Code attribute is populated and no value is specified for Hazard mat class Code field. |
|
This is required if Product Size Code Maintenance Agency attribute is populated. |
This message is generated when the Product Size Code Maintenance Agency attribute is populated and no value is specified for Product Size Code field. |
|
This is required if Product Size Code attribute is populated. |
This message is generated when the Product Size Code attribute is populated and no value is specified for Product Size Code Maintenance Agency field. |
|
This is required if Material Code Agency attribute is populated. |
This message is generated when the Material Code Agency attribute is populated and no value is specified for Packaging Material Code field. |
|
This is required if the Packaging Material Code attribute is populated. |
This message is generated when the Packaging Material Code attribute is populated and no value is specified for Material Code Agency field. |
|
This is required if List Price is populated. |
This message is generated when the List Price attribute is populated and no value is specified for List Price Basis Per Unit field. |
|
This is required if Color Code Maintenance Agency attribute is populated. |
This message is generated when the Color Code Maintenance Agency attribute is populated and no value is specified for Color field. |
|
This is required when the Color attribute is populated. |
This message is generated when the Color attribute is populated and no value is specified for Color Code Maintenance Agency field. |
|
This is a mandatory field. |
This message is generated if there is no value specified for a mandatory field. |
|
Invalid Packaging Type. |
This message is generated if the packaging type specified is invalid. |
|
EAN UCC Code and Type is Required if the Product Type is Case or Each. |
This message is generated if the EAN UCC Code and Type is not specified when the product type is case or each. |
|
Action not allowed for Trade Item |
This message is generated when the user does not have access to perform certain actions for the trade item. |
|
Trade Item {0} does not exist or user does not have enough privileges. |
This message is generated when the user tries to access a trade item and it either does not exist in the system or does not have access to that trade item. |
|
This is required if the Product Strength attribute is populated. |
This message is generated when the Product Strength attribute is populated and no value is specified for Product Strength Basis field. |
|
This is required if the Product Strength Basis attribute is populated. |
This message is generated when the Product Strength Basis attribute is populated and no value is specified for Product Strength field. |
|
This is required if the Product is Base or Concentrate. |
This message is generated when product is base or concentrate and no value is specified for Ready to Use Volume. |
|
This is required if the Fat Content attribute is populated. |
This message is generated when Fat Content attribute is populated and no value is specified for Fat Content Basis UOM. |
|
EAN UCC Code is invalid for the specified EAN UCC Type |
This message is generated when the user has specified an invalid EAN UCC Code for the EAN UCC Type. |
|
This is required if EAN UCC Type is populated. |
This message is generated when the EAN UCC Type is specified and no value is specified for EAN UCC Code. |
|
This is required if EAN UCC Code is populated. |
This message is generated when the EAN UCC Code is specified and no value is specified for EAN UCC Type. |
|
Start and End availability dates does not match |
This message is generated when the start and end dates that is specified do not match. |
|
First and Last ship dates does not match |
This message is generated when the first and last ship dates that are specified do not match. |
|
First and Last arrival dates does not match |
This message is generated when the first and last arrival dates that are specified do not match. |
|
This is required if Recommended Sales Price is populated |
This message is generated when Recommended Sales Price is populated and no value is specified for Recommended Sales Price Basis per Unit and Recommended Sales Price Currency attributes. |
|
This is required if Recommended Sales Price Currency is populated |
This message is generated when Recommended Sales Price Currency is populated and no value is specified for Recommended Sales Price. |
|
This is required if Trade Item is Orderable |
This message is generated when the user specifies that the trade item is orderable and no value is specified for Ordering Sizing Factor attribute. |
|
This is required if any retailer distributor specific attributes are populated |
This message is generated if any retailer distributor specific attributes are populated and no value is specified for Retailer/Distributor GLN attribute. |
|
This is required if the Retailer Distributor Item Description attribute is populated |
This message is generated when Retailer Distributor Item Description attribute is populated and no value is specified for Retailer/Distributor Item Number. |
|
This is required if the Retailer Distributor Property attribute is populated |
This message is generated when Retailer Distributor Property attribute is populated and no value is specified for Retailer/Distributor Property Value. |
|
This is required if Maximum Order Quantity, Minimum Order Quantity, Minimum Ship Quantity or Maximum Ship Quantity is populated. |
This message is generated when any of the attributes mentioned have been populated and no value is specified for Order Quantity Multiple UOM. |
|
This is required if any of the following attribute is populated. · Hazard Code · Hazardous Type Classification System · Dangerous Goods A Margin Number · Dangerous Group Packing Group · Dangerous Goods Shipping Name · Dangerous Goods Technical Name |
All the attributes that are mentioned need to be specified. Even if one attribute is not specified then this message is generated. |
|
Please enter a valid value. |
This message is generated when the user enters an invalid value. |
For information about the error and confirmation messages from 1 Sync, refer the 1 Sync Result Code listing document (Results_Code_Listing_R4.1.3v1.pdf ).
IBM may not offer the products, services, or features discussed in this document in all countries. Consult your local IBM representative for information on the products and services currently available in your area. Any reference to an IBM product, program, or service is not intended to state or imply that only that IBM product, program, or service may be used. Any functionally equivalent product, program, or service that does not infringe any IBM intellectual property right may be used instead. However, it is the user's responsibility to evaluate and verify the operation of any non-IBM product, program, or service.
IBM may have patents or pending patent applications covering subject matter described in this document. The furnishing of this document does not give you any license to these patents. You can send license inquiries, in writing, to:
IBM Director of Licensing
IBM Corporation
North Castle Drive
Armonk, NY 10504-1785
U.S.A.
The following paragraph does not apply to the United Kingdom or any other country where such provisions are inconsistent with local law:
INTERNATIONAL BUSINESS MACHINES CORPORATION PROVIDES THIS PUBLICATION AS IS WITHOUT WARRANTY OF ANY KIND, EITHER EXPRESS OR IMPLIED, INCLUDING, BUT NOT LIMITED TO, THE IMPLIED WARRANTIES OF NON-INFRINGEMENT, MERCHANTABILITY OR FITNESS FOR A PARTICULAR PURPOSE. Some states do not allow disclaimer of express or implied warranties in certain transactions, therefore, this statement may not apply to you.
This information could include technical inaccuracies or typographical errors. Changes are periodically made to the information herein; these changes will be incorporated in new editions of the publication. IBM may make improvements and/or changes in the product(s) and/or program(s) described in this publication at any time without notice.
Any references in this information to non-IBM Web sites are provided for convenience only and do not in any manner serve as an endorsement of those Web sites. The materials at those Web sites are not part of the materials for this IBM product and use of those Web sites is at your own risk.
IBM may use or distribute any of the information you supply in any way it believes appropriate without incurring any obligation to you.
Licensees of this program who wish to have information about it for the purpose of enabling: (i) the exchange of information between independently created programs and other programs (including this one) and (ii) the mutual use of the information which has been exchanged, should contact:
IBM Burlingame Laboratory
Director IBM Burlingame Laboratory
577 Airport Blvd., Suite 800
Burlingame, CA 94010
U.S.A
Such information may be available, subject to appropriate terms and conditions, including in some cases, payment of a fee.
The licensed program described in this document and all licensed material available for it are provided by IBM under terms of the IBM Customer Agreement, IBM International Program License Agreement, or any equivalent agreement between us.
Any performance data contained herein was determined in a controlled environment. Therefore, the results obtained in other operating environments may vary significantly. Some measurements may have been made on development-level systems and there is no guarantee that these measurements will be the same on generally available systems. Furthermore, some measurement may have been estimated through extrapolation. Actual results may vary. Users of this document should verify the applicable data for their specific environment.
Information concerning non-IBM products was obtained from the suppliers of those products, their published announcements or other publicly available sources. IBM has not necessarily tested those products and cannot confirm the accuracy of performance, compatibility or any other claims related to non-IBM products. Questions on the capabilities of non-IBM products should be addressed to the suppliers of those products.
This information may contain examples of data and reports used in daily business operations. To illustrate them as completely as possible, the examples may include the names of individuals, companies, brands, and products. All of these names are fictitious and any similarity to the names and addresses used by an actual business enterprise is entirely coincidental.
All statements regarding IBM's future direction or intent are subject to change or withdrawal without notice, and represent goals and objectives only.
Programming interface information, if provided, is intended to help you create application software using this program.
General-use programming interfaces allow you to write application software that obtain the services of this program's tools.
However, this information may also contain diagnosis, modification, and tuning information. Diagnosis, modification and tuning information is provided to help you debug your application software.
Warning: Do not use this diagnosis, modification, and tuning information as a programming interface because it is subject to change.
The following terms are trademarks or registered trademarks of International Business Machines Corporation in the United States or other countries, or both:
IBM
the IBM logo
AIX
CrossWorlds
DB2
DB2 Universal Database
Domino
Lotus
Lotus Notes
MQIntegrator
MQSeries
Tivoli
WebSphere
Microsoft, Windows, Windows NT, and the Windows logo are trademarks of Microsoft Corporation in the United States, other countries, or both.
MMX, Pentium, and ProShare are trademarks or registered trademarks of Intel Corporation in the United States, other countries, or both.
Java and all Java-based trademarks are trademarks of Sun Microsystems, Inc. in the United States, other countries, or both.
Other company, product or service names may be trademarks or service marks of others.